Puppeteer is a project from the Google Chrome team which enables us to control a Chrome (or any other Chrome DevTools Protocol based browser) and execute common actions, much like in a real browser – programmatically, through a decent API.
Put simply, it’s a super useful and easy tool for automating, testing and scraping web pages over a headless mode or headful either.
In this article we’re going to try out Puppeteer and demonstrate a variety of the available capabilities, through concrete examples.
Disclaimer: This article doesn’t claim to replace [the official documentation][docs] but rather elaborate it – you definitely should go over it in order to be aligned with the most updated API specification.
How to Install
To begin with, we’ll have to install one of Puppeteer’s packages.
Library Package
A lightweight package, called puppeteer-core, which is a library that interacts with any browser that’s based on DevTools protocol – without actually installing Chromium. It comes in handy mainly when we don’t need a downloaded version of Chromium, for instance, bundling this library within a project that interacts with a browser remotely.
In order to install, just run:
npm install puppeteer-coreProduct Package
The main package, called puppeteer, which is actually a full product for browser automation on top of puppeteer-core. Once it’s installed, the most recent version of Chromium is placed inside node_modules, what guarantees that the downloaded version is compatible with the host operating system.
Simply run the following to install:
npm install puppeteerNow, we’re absolutely ready to go! 🤓
Interacting Browser
As mentioned before, Puppeteer is just an API over the Chrome DevTools Protocol. Naturally, it should have a Chromium instance to interact with. This is the reason why Puppeteer’s ecosystem provides methods to launch a new Chromium instance and connect an existing instance also.
Let’s examine a few cases.
Launching Chromium
The easiest way to interact with the browser is by launching a Chromium instance using Puppeteer:
const puppeteer = require('puppeteer');

(async () => {
  const browser = await puppeteer.launch();
  console.info(browser);
  await browser.close();
})();
The launch method initializes the instance at first, and then attaching Puppeteer to that.
Notice this method is asynchronous (like most Puppeteer’s methods) which, as we know, returns a Promise. Once it’s resolved, we get a browser instance that represents our initialized instance.
Connecting Chromium
Sometimes we want to interact with an existing Chromium instance – whether using puppeteer-core or just attaching a remote instance:
const chromeLauncher = require('chrome-launcher');
const axios = require('axios');
const puppeteer = require('puppeteer');

(async () => {
  // Initializing a Chrome instance manually
  const chrome = await chromeLauncher.launch({
    chromeFlags: ['--headless']
  });
  const response = await axios.get(`http://localhost:${chrome.port}/json/version`);
  const { webSocketDebuggerUrl } = response.data;

  // Connecting the instance using `browserWSEndpoint`
  const browser = await puppeteer.connect({ browserWSEndpoint: webSocketDebuggerUrl });
  console.info(browser);

  await browser.close();
  await chrome.kill();
})();
Well, it’s easy to see that we use chrome-launcher in order to launch a Chrome instance manually.
Then, we simply fetch the webSocketDebuggerUrl value of the created instance.
The connect method attaches the instance we just created to Puppeteer. All we’ve to do is supplying the WebSocket endpoint of our instance.
Note: Of course, chrome-launcher is only to demonstrate an instance creation. We absolutely could connect an instance in other ways, as long as we have the appropriate WebSocket endpoint.
Launching Firefox
Some of you might wonder – could Puppeteer interact with other browsers besides Chromium? 🤔
Although there are projects that claim to support the variety browsers – the official team has started to maintain an experimental project that interacts with Firefox, specifically:
npm install puppeteer-firefoxUpdate: puppeteer-firefox was an experimental package to examine communication with an outdated Firefox fork, however, this project is no longer maintained. Presently, the way to go is by setting the PUPPETEER_PRODUCT environment variable to firefox and so fetching the binary of Firefox Nightly.
We can easily do that as part of the installation:
PUPPETEER_PRODUCT=firefox npm install puppeteerAlternatively, we can use the BrowserFetcher to fetch the binary.
Once we’ve the binary, we merely need to change the product to "firefox" whereas the rest of the lines remain the same – what means we’re already familiar with how to launch the browser:
// Deprecated package
// const puppeteer = require('puppeteer-firefox');
const puppeteer = require('puppeteer');

(async () => {
  // FireFox's binary is needed to be fetched before
  const browser = await puppeteer.launch({ product: 'firefox' });
  console.info(browser);
  await browser.close();
})();
⚠️ Pay attention – the API integration isn’t totally ready yet and implemented progressively. Also, it’s better to check out the implementation status here.
Browser Context
Imagine that instead of recreating a browser instance each time, which is pretty expensive operation, we could use the same instance but separate it into different individual sessions which belong to this shared browser.
It’s actually possible, and these sessions are known as Browser Contexts.
A default browser context is created as soon as creating a browser instance, but we can create additional browser contexts as necessary:
const puppeteer = require('puppeteer');

(async () => {
  const browser = await puppeteer.launch();

  // A reference for the default browser context
  const defaultContext = browser.defaultBrowserContext();
  console.info(defaultContext.isIncognito()); // False

  // Creates a new browser context
  const newContext = await browser.createIncognitoBrowserContext();
  console.info(newContext.isIncognito()); // True

  // Closes the created browser context
  await newContext.close();

  // Closes the browser with the default context
  await browser.close();
})();
Apart from the fact that we demonstrate how to access each context, we need to know that the only way to terminate the default context is by closing the browser instance – which, in fact, terminates all the contexts that belong to the browser.
Better yet, the browser context also come in handy when we want to apply a specific configuration on the session isolatedly – for instance, granting additional permissions.
Headful Mode
As opposed to the headless mode – which merely uses the command line,
the headful mode opens the browser with a graphical user interface during the instruction:
const puppeteer = require('puppeteer');

(async () => {
  // Makes the browser to be launched in a headful way
  const browser = await puppeteer.launch({ headless: false });
  console.info(browser);
  await browser.close();
})();
Because of the fact that the browser is launched in headless mode by default, we demonstrate how to launch it in a headful way.
In case you wonder – headless mode is mostly useful for environments that don’t really need the UI or neither support such an interface. The cool thing is that we can headless almost everything in Puppeteer. 💪
Note: We’re going to launch the browser in a headful mode for most of the upcoming examples, which will allow us to notice the result clearly.
Debugging
When writing code, we should be aware of what kinds of ways are available to debug our program. The documentation lists several tips about debugging Puppeteer.
Let’s cover the core principles:
1️⃣ – Checking how the browser is operated
That’s fairly probable we would like to see how our script instructs the browser and what’s actually displayed, at some point.
The headful mode, which we’re already familiar with, helps us to practically do that:
const puppeteer = require('puppeteer');

(async () => {
  const browser = await puppeteer.launch({ headless: false, slowMo: 200 });

  // Browser operations

  await browser.close();
})();
Beyond that the browser is truly opened, we can notice now the operated instructions clearly – due to slowMo which slows down Puppeteer when performing each operation.
2️⃣ – Debugging our application code in the browser
In case we want to debug the application itself in the opened browser – it basically means to open the DevTools and start debugging as usual:
const puppeteer = require('puppeteer');

(async () => {
  const browser = await puppeteer.launch({ devtools: true });

  // Browser operations

  // Holds the browser until we terminate the process explicitly
  await browser.waitForTarget(() => false);

  await browser.close();
})();
Notice that we use devtools which launches the browser in a headful mode by default and opens the DevTools automatically.
On top of that, we utilize waitForTarget in order to hold the browser process until we terminate it explicitly.
Apparently – some of you may wonder if it’s possible to sleep the browser with a specified time period, so:
const puppeteer = require('puppeteer');

(async () => {
  const browser = await puppeteer.launch({ devtools: true });

  // Browser operations

  // Option 1 - resolving a promise when `setTimeout` finishes
  const sleep = duration => new Promise(resolve => setTimeout(resolve, duration));
  await sleep(3000);

  // Option 2 - if we have a page instance, just using `waitFor`
  await page.waitFor(3000);

  await browser.close();
})();
The first approach is merely a function that resolves a promise when setTimeout finishes.
The second approach, however, is much simpler but demands having a page instance (we’ll get to that later).
3️⃣ – Debugging the process that uses Puppeteer
As we know, Puppeteer is executed in a Node.js process – which is absolutely separated from the browser process.
Hence, in this case, we should treat it as much as we debug a regular Node.js application.
Whether we connect to an inspector client or prefer using ndb –
it’s all about placing the breakpoints right before Puppeteer’s operation. Adding them programmatically is possible either, simply by inserting the debugger; statement, obviously.
Interacting Page
Now that Puppeteer is attached to a browser instance – which, as we already mentioned, represents our browser instance (Chromium, Firefox, whatever),
allows us creating easily a page (or multiple pages):
const puppeteer = require('puppeteer');

(async () => {
  const browser = await puppeteer.launch();

  // Creates a new page on the default browser context
  const page = await browser.newPage();
  console.info(page);

  await browser.close();
})();
In the code example above we plainly create a new page by invoking the newPage method. Notice it’s created on the default browser context.
Basically, Page is a class that represents a single tab in the browser (or an extension background).
As you guess, this class provides handy methods and events in order to interact with the page (such as selecting elements, retrieving information, waiting for elements, etc.).
Well, it’s about time to present a list of practical examples, as promised. To do this, we’re going to scrape data from the official Puppeteer website and operate it.🕵
Navigating by URL
One of the earliest things is, intuitively, instructing the blank page to navigate to a specified URL:
const puppeteer = require('puppeteer');

(async () => {
  const browser = await puppeteer.launch({ headless: false });
  const page = await browser.newPage();

  // Instructs the blank page to navigate a URL
  await page.goto('https://pptr.dev');

  // Fetches page's title
  const title = await page.title();
  console.info(`The title is: ${title}`);

  await browser.close();
})();
We use goto to drive the created page to navigate Puppeteer’s website. Afterward, we just take the title of Page’s main frame, print it, and expect to get that as an output:
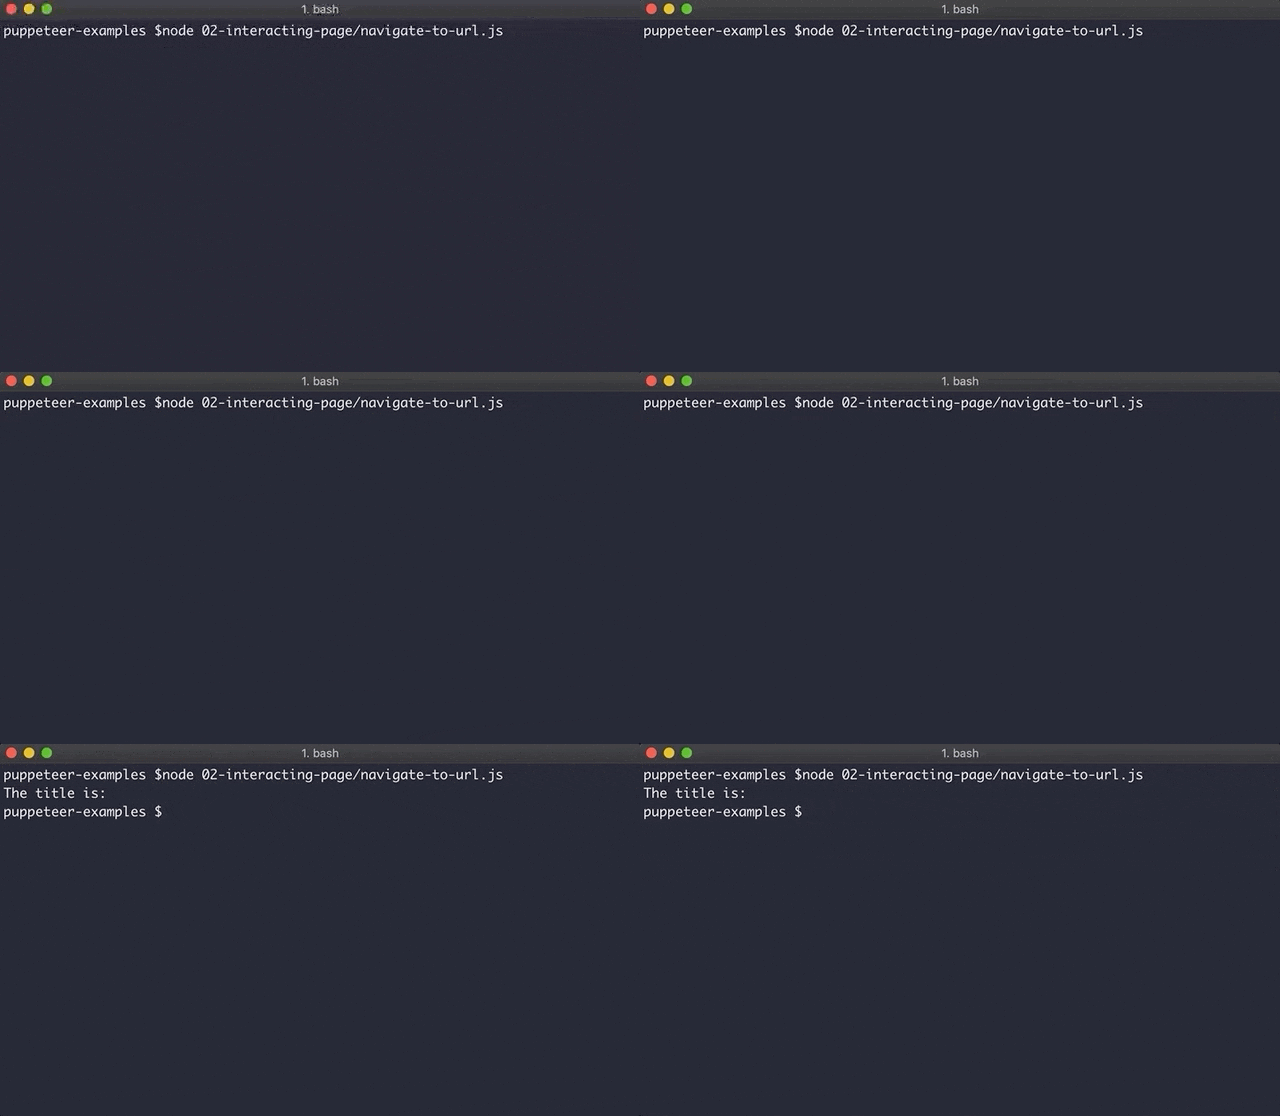
As we notice, the title is unexpectedly missing. 🧐
This example shows us which there’s no guarantee that our page would render the selected element at the right moment, and if anything.
To clarify – possible reasons could be that the page is loaded slowly, part of the page is lazy-loaded, or perhaps it’s navigated immediately to another page.
That’s exactly why Puppeteer provides methods to wait for stuff like elements, navigation, functions, requests, responses or simply a certain predicate – mainly to deal with an asynchronous flow.
Anyway, it turns out that Puppeteer’s website has an entry page, which immediately redirects us to the well-known website’s index page.
The thing is, that entry page in question doesn’t render a title meta element:
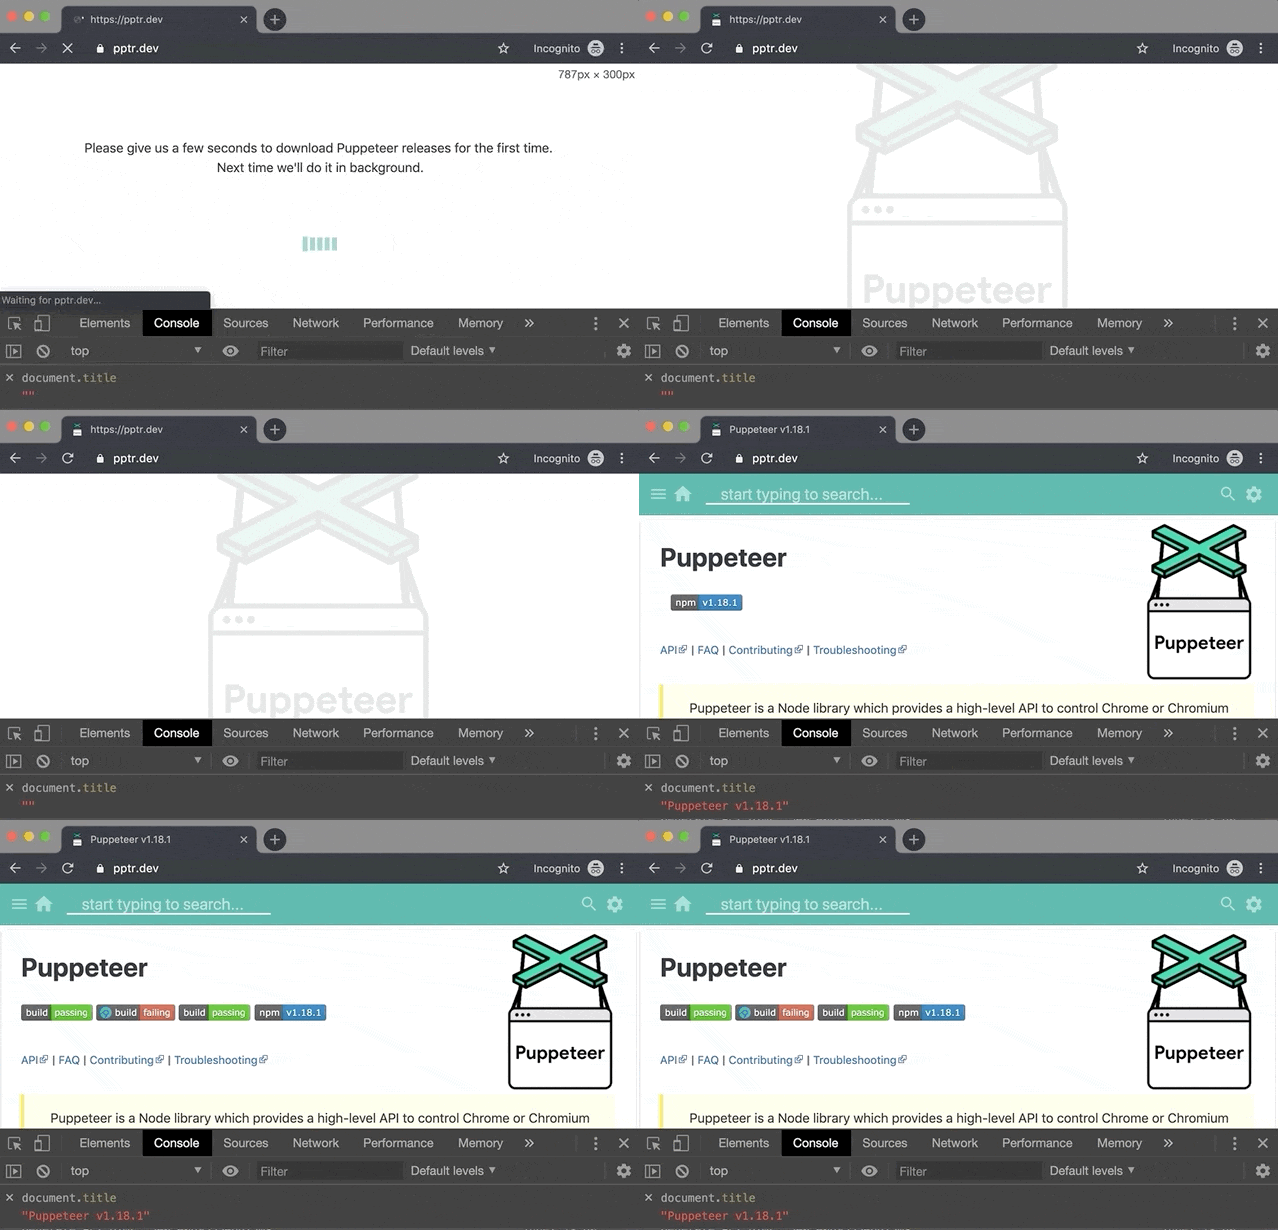
When navigating to Puppeteer’s website, the title element is evaluated as an empty string. However, a few moments later, the page is really navigated to the website’s index page and rendered with a title.
This means that the invoked title method is actually applied too early, on the entry page, instead of the website’s index page. Thus, the entry page is considered as the first main frame, and eventually its title, which is an empty string, is returned.
Let’s solve that case in a simple way:
const puppeteer = require('puppeteer');

(async () => {
  const browser = await puppeteer.launch({ headless: false });
  const page = await browser.newPage();

  await page.goto('https://pptr.dev');

  // Waits until the `title` meta element is rendered
  await page.waitForSelector('title');

  const title = await page.title();
  console.info(`The title is: ${title}`);

  await browser.close();
})();
All we do, is instructing Puppeteer to wait until the page renders a title meta element, which is achieved by invoking waitForSelector. This method basically waits until the selected element is rendered within the page.
In that way – we can easily deal with asynchronous rendering and ensure that elements are visible on the page.
Emulating Devices
Puppeteer’s library provides tools for approximating how the page looks and behaves on various devices, which are pretty useful when testing a website’s responsiveness.
Let’s emulate a mobile device and navigate to the official website:
const puppeteer = require('puppeteer');

(async () => {
  const browser = await puppeteer.launch({ headless: false });
  const page = await browser.newPage();

  // Emulates an iPhone X
  await page.setUserAgent('Mozilla/5.0 (iPhone; CPU iPhone OS 11_0 like Mac OS X) AppleWebKit/604.1.38 (KHTML, like Gecko) Version/11.0 Mobile/15A372 Safari/604.1');
  await page.setViewport({ width: 375, height: 812 });

  await page.goto('https://pptr.dev');

  await browser.close();
})();
We choose to emulate an iPhone X – which means changing the user agent appropriately.
Furthermore, we adjust the viewport size according to known display points.
It’s easy to understand that setUserAgent defines a specific user agent for the page, whereas setViewport modifies the viewport definition of the page. In case of multiple pages, each one has its own user agent and viewport definition.
Here’s the result of the code example above:
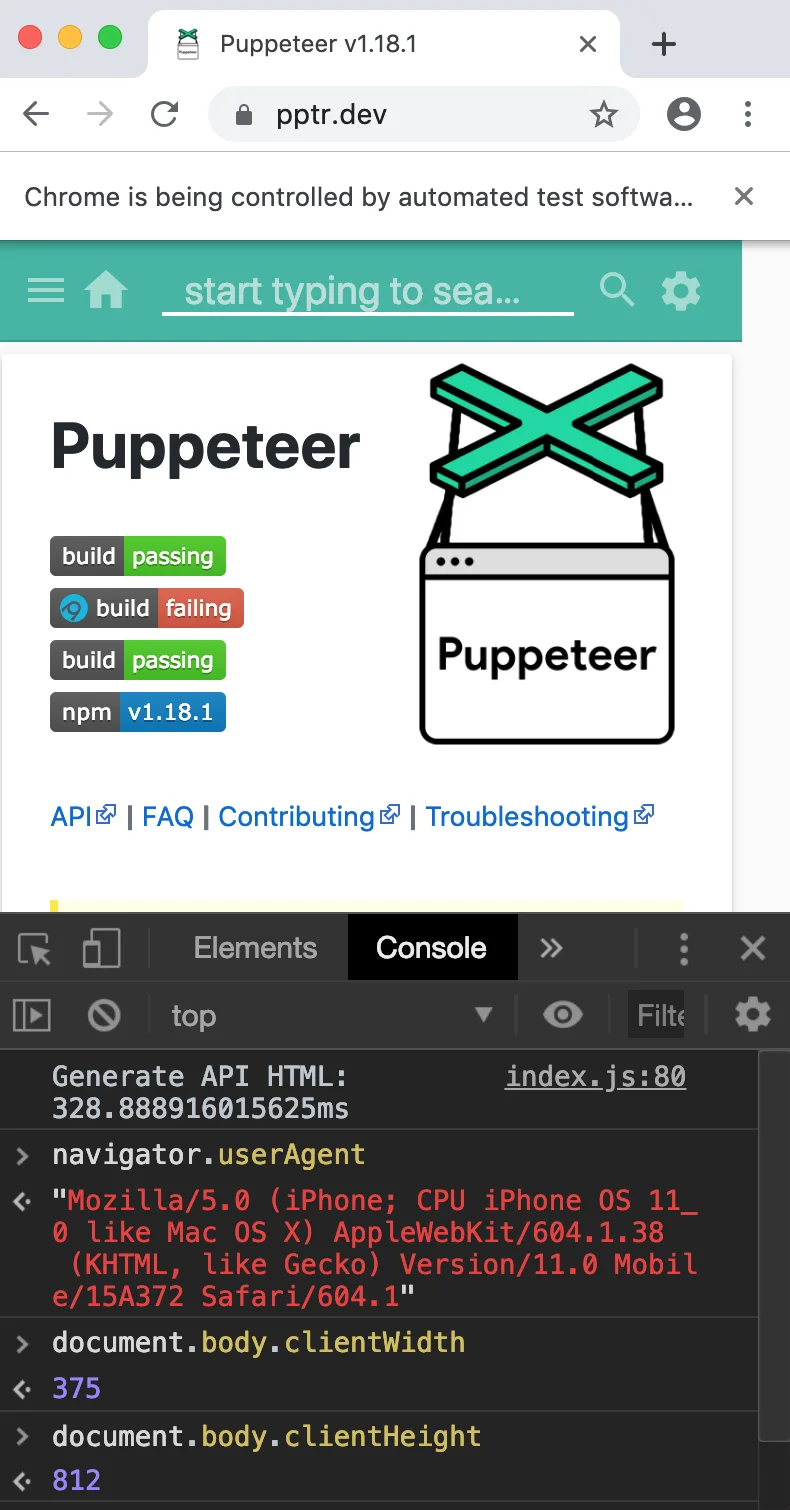
Indeed, the console panel shows us that the page is opened with the right user agent and viewport size.
The truth is that we don’t have to specify the iPhone X’s descriptions explicitly, because the library arrives with a built-in list of device descriptors. On top of that, it provides a method called emulate which is practically a shortcut for invoking setUserAgent and setViewport, one after another.
Let’s use that:
const puppeteer = require('puppeteer');
const devices = require('puppeteer/DeviceDescriptors');

(async () => {
  const browser = await puppeteer.launch({ headless: false });
  const page = await browser.newPage();

  await page.emulate(devices['iPhone X']);
  await page.goto('https://pptr.dev');

  await browser.close();
})();
It’s merely changed to pass the boilerplate descriptor to emulate (instead of declaring that explicitly).
Notice we import the descriptors out of puppeteer/DeviceDescriptors.
Handling Events
The Page class supports emitting of various events by actually extending the Node.js’s EventEmitter object.
This means we can use the natively supported methods in order to handle these events – such as: on, once, removeListener and so on.
Here’s the list of the supported events:
const puppeteer = require('puppeteer');

(async () => {
  const browser = await puppeteer.launch();
  const page = await browser.newPage();

  // Emitted when the DOM is parsed and ready (without waiting for resources)
  page.once('domcontentloaded', () => console.info('✅ DOM is ready'));

  // Emitted when the page is fully loaded
  page.once('load', () => console.info('✅ Page is loaded'));

  // Emitted when the page attaches a frame
  page.on('frameattached', () => console.info('✅ Frame is attached'));

  // Emitted when a frame within the page is navigated to a new URL
  page.on('framenavigated', () => console.info('👉 Frame is navigated'));

  // Emitted when a script within the page uses `console.timeStamp`
  page.on('metrics', data => console.info(`👉 Timestamp added at ${data.metrics.Timestamp}`));

  // Emitted when a script within the page uses `console`
  page.on('console', message => console[message.type()](`👉 ${message.text()}`));

  // Emitted when the page emits an error event (for example, the page crashes)
  page.on('error', error => console.error(`❌ ${error}`));

  // Emitted when a script within the page has uncaught exception
  page.on('pageerror', error => console.error(`❌ ${error}`));

  // Emitted when a script within the page uses `alert`, `prompt`, `confirm` or `beforeunload`
  page.on('dialog', async dialog => {
    console.info(`👉 ${dialog.message()}`);
    await dialog.dismiss();
  });

  // Emitted when a new page, that belongs to the browser context, is opened
  page.on('popup', () => console.info('👉 New page is opened'));

  // Emitted when the page produces a request
  page.on('request', request => console.info(`👉 Request: ${request.url()}`));

  // Emitted when a request, which is produced by the page, fails
  page.on('requestfailed', request => console.info(`❌ Failed request: ${request.url()}`));

  // Emitted when a request, which is produced by the page, finishes successfully
  page.on('requestfinished', request => console.info(`👉 Finished request: ${request.url()}`));

  // Emitted when a response is received
  page.on('response', response => console.info(`👉 Response: ${response.url()}`));

  // Emitted when the page creates a dedicated WebWorker
  page.on('workercreated', worker => console.info(`👉 Worker: ${worker.url()}`));

  // Emitted when the page destroys a dedicated WebWorker
  page.on('workerdestroyed', worker => console.info(`👉 Destroyed worker: ${worker.url()}`));

  // Emitted when the page detaches a frame
  page.on('framedetached', () => console.info('✅ Frame is detached'));

  // Emitted after the page is closed
  page.once('close', () => console.info('✅ Page is closed'));

  await page.goto('https://pptr.dev');

  await browser.close();
})();
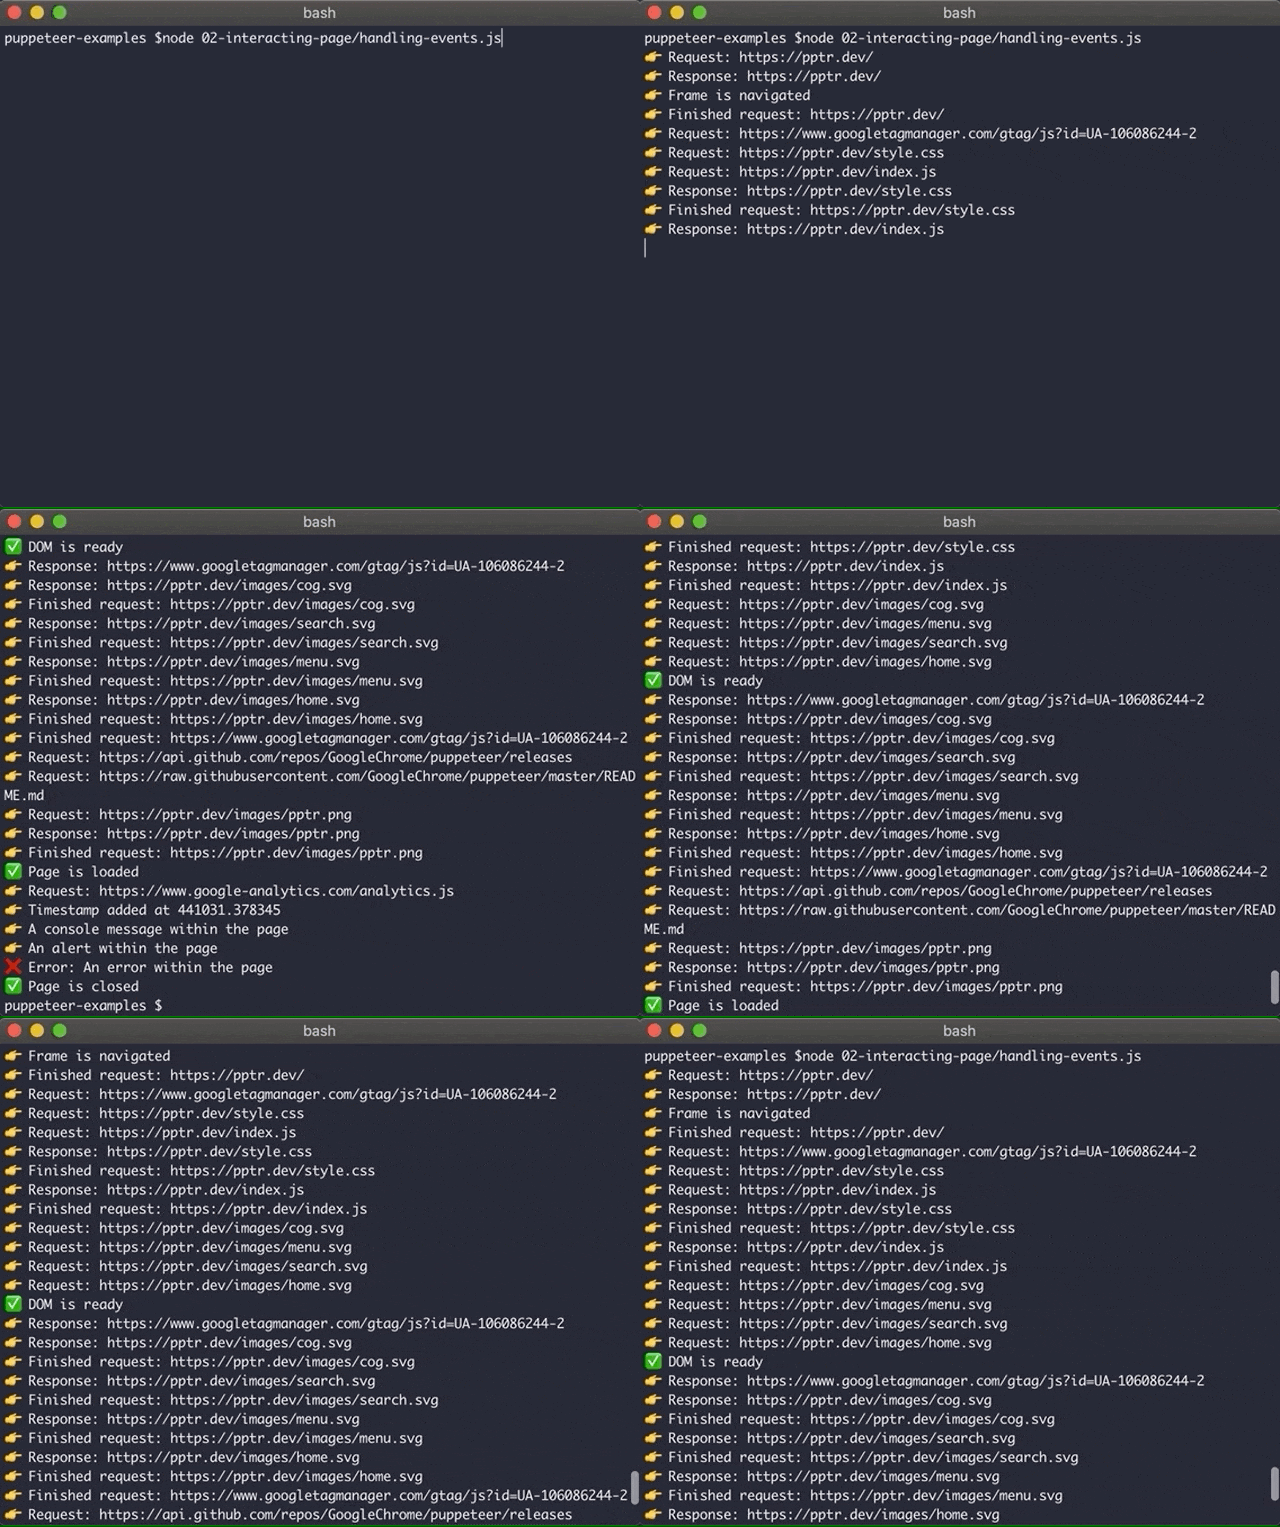
From looking at the list above – we clearly understand that the supported events include aspects of loading, frames, metrics, console, errors, requests, responses and even more!
Let’s simulate and trigger part of the events by adding this script:
// Triggers `metrics` event
await page.evaluate(() => console.timeStamp());

// Triggers `console` event
await page.evaluate(() => console.info('A console message within the page'));

// Triggers `dialog` event
await page.evaluate(() => alert('An alert within the page'));

// Triggers `error` event
await page.emit('error', new Error('An error within the page'));

// Triggers `close` event
await page.close();
As we probably know, evaluate just executes the supplied script within the page context.
Though, the output is going to reflect the events we listen:
In case you wonder – it’s possible to listen for custom events that are triggered in the page. Basically it means to define the event handler on page’s window using the exposeFunction method.
Check out this example to understand exactly how to implement it.
Operating Mouse
In general, the mouse controls the motion of a pointer in two dimensions within a viewport.
Unsurprisingly, Puppeteer represents the mouse by a class called Mouse.
Moreover, every Page instance has a Mouse – which allows performing operations such as changing its position and clicking within the viewport.
Let’s start with changing the mouse position:
const puppeteer = require('puppeteer');

(async () => {
  const browser = await puppeteer.launch({ headless: false });
  const page = await browser.newPage();

  await page.setViewport({ width: 1920, height: 1080 });
  await page.goto('https://pptr.dev');

  // Waits until the API sidebar is rendered
  await page.waitForSelector('sidebar-component');

  // Hovers the second link inside the API sidebar
  await page.mouse.move(40, 150);

  await browser.close();
})();
The scenario we simulate is moving the mouse over the second link of the left API sidebar.
We set a viewport size and wait explicitly for the sidebar component to ensure it’s really rendered.
Then, we invoke move in order to position the mouse with appropriate coordinates, that actually represent the center of the second link.
This is the expected result:
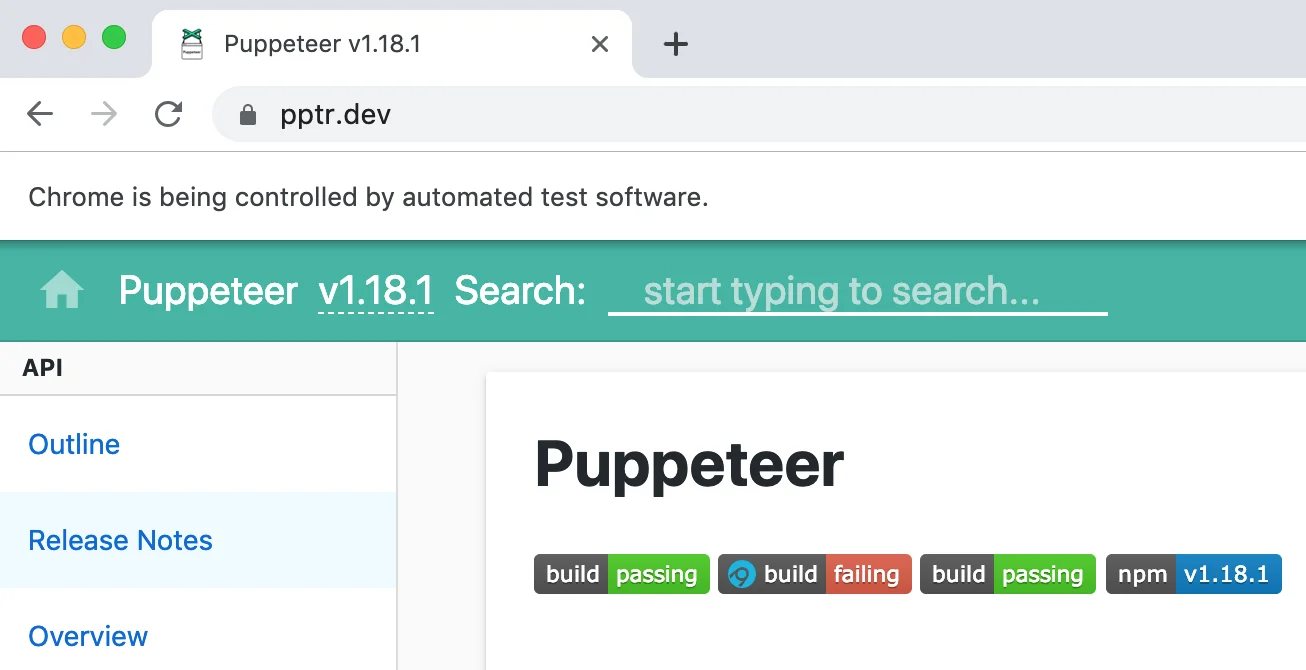
Although it’s hard to see, the second link is hovered as we planned.
The next step is simply clicking on the link by the respective coordinates:
const puppeteer = require('puppeteer');

(async () => {
  const browser = await puppeteer.launch({ headless: false });
  const page = await browser.newPage();

  await page.setViewport({ width: 1920, height: 1080 });
  await page.goto('https://pptr.dev');
  await page.waitForSelector('sidebar-component');

  // Clicks the second link and triggers `mouseup` event after 1000ms
  await page.mouse.click(40, 150, { delay: 1000 });

  await browser.close();
})();
Instead of changing the position explicitly, we just use click – which basically triggers mousemove, mousedown and mouseup events, one after another.
Note: We delay the pressing in order to demonstrate how to modify the click behavior, nothing more. It’s worth pointing out that we can also control the mouse buttons (left, center, right) and the number of clicks.
Another nice thing is the ability to simulate a drag and drop behavior easily:
const puppeteer = require('puppeteer');

(async () => {
  const browser = await puppeteer.launch({ headless: false });
  const page = await browser.newPage();

  await page.setViewport({ width: 1920, height: 1080 });
  await page.goto('https://pptr.dev');
  await page.waitForSelector('sidebar-component');

  // Drags the mouse from a point
  await page.mouse.move(0, 0);
  await page.mouse.down();

  // Drops the mouse to another point
  await page.mouse.move(100, 100);
  await page.mouse.up();

  await browser.close();
})();
All we do is using the Mouse methods for grabbing the mouse, from one position to another, and afterward releasing it.
Operating Keyboard
The keyboard is another way to interact with the page, mostly for input purposes.
Similar to the mouse, Puppeteer represents the keyboard by a class called Keyboard – and every Page instance holds such an instance.
Let’s type some text within the search input:
const puppeteer = require('puppeteer');

(async () => {
  const browser = await puppeteer.launch({ headless: false });
  const page = await browser.newPage();

  await page.setViewport({ width: 1920, height: 1080 });
  await page.goto('https://pptr.dev');

  // Waits until the toolbar is rendered
  await page.waitForSelector('toolbar-component');

  // Focuses the search input
  await page.focus('[type="search"]');

  // Types the text into the focused element
  await page.keyboard.type('Keyboard', { delay: 100 });

  await browser.close();
})();
Notice that we wait for the toolbar (instead of the API sidebar).
Then, we focus the search input element and simply type a text into it.
On top of typing text, it’s obviously possible to trigger keyboard events:
const puppeteer = require('puppeteer');

(async () => {
  const browser = await puppeteer.launch({ headless: false });
  const page = await browser.newPage();

  await page.setViewport({ width: 1920, height: 1080 });
  await page.goto('https://pptr.dev');
  await page.waitForSelector('toolbar-component');

  await page.focus('[type="search"]');
  await page.keyboard.type('Keyboard', { delay: 100 });

  // Choosing the third result
  await page.keyboard.press('ArrowDown', { delay: 200 });
  await page.keyboard.press('ArrowDown', { delay: 200 });
  await page.keyboard.press('Enter');

  await browser.close();
})();
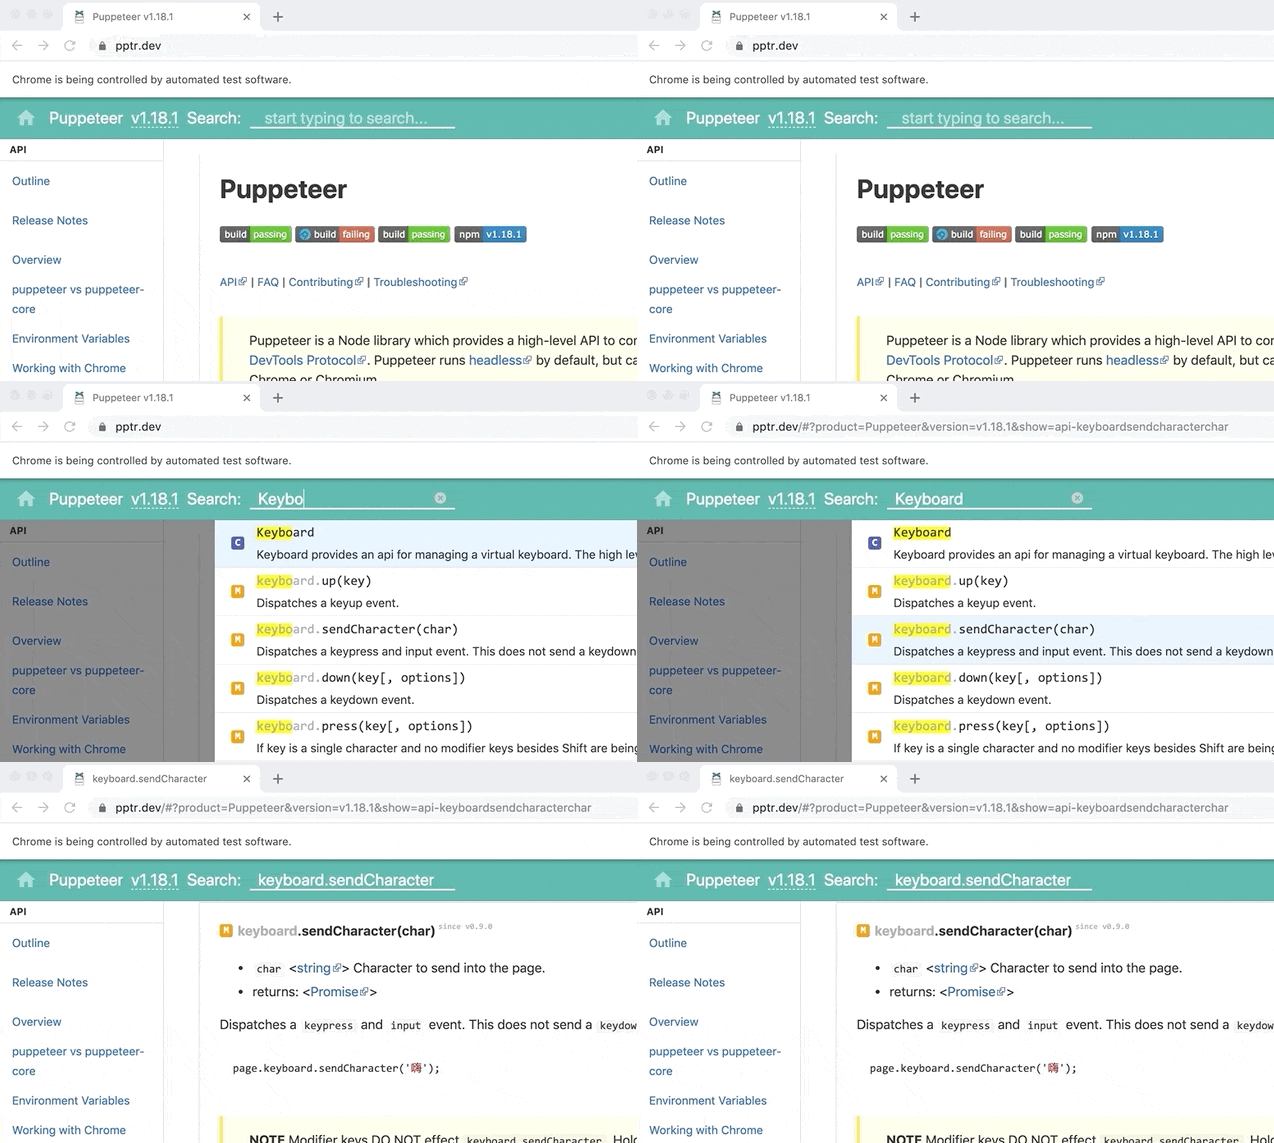
Basically, we press ArrowDown twice and Enter in order to choose the third search result.
See that in action:
By the way, it’s nice to know that there is a list of the key codes.
Taking Screenshots
Taking screenshots through Puppeteer is a quite easy mission.
The API provides us a dedicated method for that:
const puppeteer = require('puppeteer');

(async () => {
  const browser = await puppeteer.launch();
  const page = await browser.newPage();

  await page.setViewport({ width: 1920, height: 1080 });
  await page.goto('https://pptr.dev');
  await page.waitForSelector('title');

  // Takes a screenshot of the whole viewport
  await page.screenshot({ path: 'screenshot.webp' });

  await browser.close();
})();
As we see, the screenshot method makes all the charm – whereas we just have to insert a path for the output.
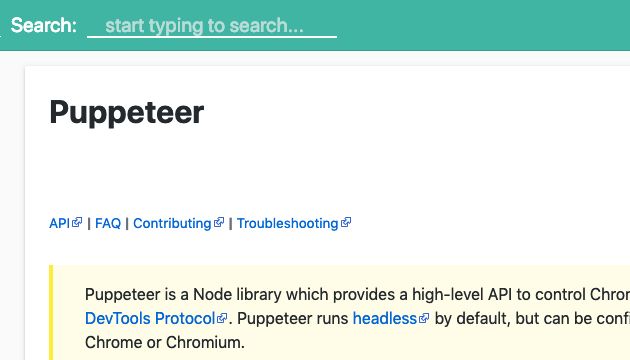
Moreover, it’s also possible to control the type, quality and even clipping the image:
const puppeteer = require('puppeteer');

(async () => {
  const browser = await puppeteer.launch();
  const page = await browser.newPage();

  await page.setViewport({ width: 1920, height: 1080 });
  await page.goto('https://pptr.dev');
  await page.waitForSelector('title');

  // Takes a screenshot of an area within the page
  await page.screenshot({
    path: 'screenshot.jpg',
    type: 'jpeg',
    quality: 80,
    clip: { x: 220, y: 0, width: 630, height: 360 }
  });

  await browser.close();
})();
Here’s the output:
Generating PDF
Puppeteer is either useful for generating a PDF file from the page content.
Let’s demonstrate that:
const puppeteer = require('puppeteer');

(async () => {
  const browser = await puppeteer.launch();
  const page = await browser.newPage();

  // Navigates to the project README file
  await page.goto('https://github.com/GoogleChrome/puppeteer/blob/master/README.md');

  // Generates a PDF from the page content
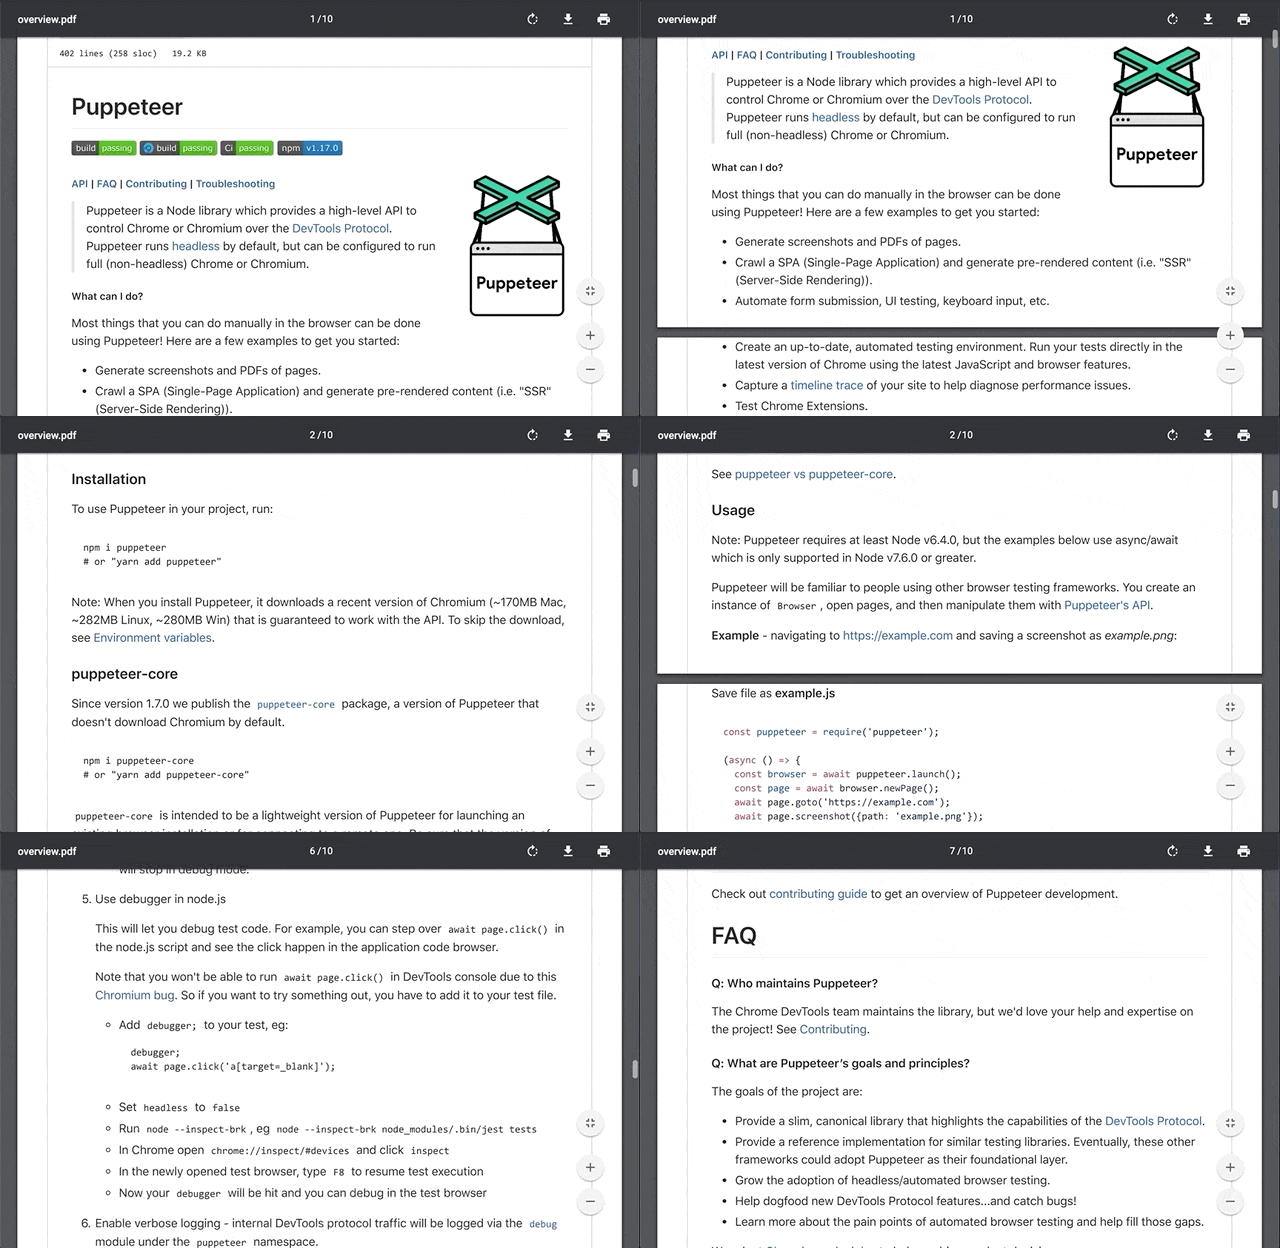
  await page.pdf({ path: 'overview.pdf' });

  await browser.close();
})();
Running the pdf method simply generates us the following file:
Faking Geolocation
Many websites customize their content based on the user’s geolocation.
Modifying the geolocation of a page is pretty obvious:
const puppeteer = require('puppeteer');

(async () => {
  const browser = await puppeteer.launch({ devtools: true });
  const page = await browser.newPage();

  // Grants permission for changing geolocation
  const context = browser.defaultBrowserContext();
  await context.overridePermissions('https://pptr.dev', ['geolocation']);

  await page.goto('https://pptr.dev');
  await page.waitForSelector('title');

  // Changes to the north pole's location
  await page.setGeolocation({ latitude: 90, longitude: 0 });

  await browser.close();
})();
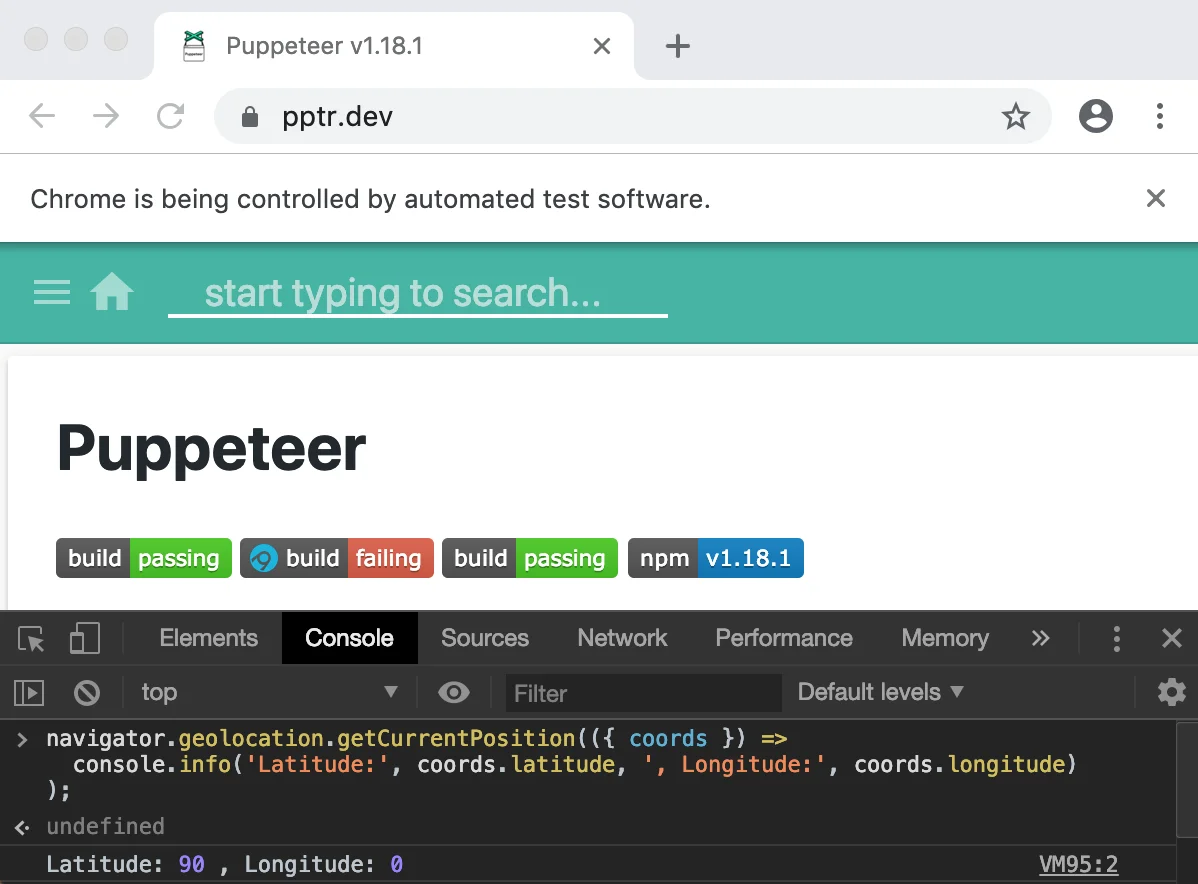
First, we grants the browser context the appropriate permissions. Then, we use setGeolocation to override the current geolocation with the coordinates of the north pole.
Here’s what we get when printing the location through navigator:
Accessibility
The accessibility tree is a subset of the DOM that includes only elements with relevant information for assistive technologies such as screen readers, voice controls and so on.
Having the accessibility tree means we can analyze and test the accessibility support in the page.
When it comes to Puppeteer, it enables to capture the current state of the tree:
const puppeteer = require('puppeteer');

(async () => {
  const browser = await puppeteer.launch();
  const page = await browser.newPage();

  await page.goto('https://pptr.dev');
  await page.waitForSelector('title');

  // Captures the current state of the accessibility tree
  const snapshot = await page.accessibility.snapshot();
  console.info(snapshot);

  await browser.close();
})();
The snapshot doesn’t pretend to be the full tree, but rather including just the interesting nodes (those which are acceptable by most of the assistive technologies).
Note: We can obtain the full tree through setting interestingOnly to false.
Code Coverage
The code coverage feature was introduced officially as part of Chrome v59 – and provides the ability to measure how much code is being used, compared to the code that is actually loaded.
In this manner, we can reduce the dead code and eventually speed up the loading time of the pages.
With Puppeteer, we can manipulate the same feature programmatically:
const puppeteer = require('puppeteer');

(async () => {
  const browser = await puppeteer.launch();
  const page = await browser.newPage();

  // Starts to gather coverage information for JS and CSS files
  await Promise.all([page.coverage.startJSCoverage(), page.coverage.startCSSCoverage()]);

  await page.goto('https://pptr.dev');
  await page.waitForSelector('title');

  // Stops the coverage gathering
  const [jsCoverage, cssCoverage] = await Promise.all([
    page.coverage.stopJSCoverage(),
    page.coverage.stopCSSCoverage()
  ]);

  // Calculates how many bytes are being used based on the coverage
  const calculateUsedBytes = (type, coverage) =>
    coverage.map(({ url, ranges, text }) => {
      let usedBytes = 0;

      ranges.forEach(range => (usedBytes += range.end - range.start - 1));

      return {
        url,
        type,
        usedBytes,
        totalBytes: text.length
      };
    });

  console.info([
    ...calculateUsedBytes('js', jsCoverage),
    ...calculateUsedBytes('css', cssCoverage)
  ]);

  await browser.close();
})();
We instruct Puppeteer to gather coverage information for JavaScript and CSS files, until the page is loaded.
Thereafter, we define calculateUsedBytes which goes through a collected coverage data and calculates how many bytes are being used (based on the coverage).
At last, we merely invoke the created function on both coverages.
Let’s look at the output:
[
   {
      url: 'https://pptr.dev/',
      type: 'js',
      usedBytes: 149,
      totalBytes: 150
   },
   {
      url: 'https://www.googletagmanager.com/gtag/js?id=UA-106086244-2',
      type: 'js',
      usedBytes: 21018,
      totalBytes: 66959
   },
   {
      url: 'https://pptr.dev/index.js',
      type: 'js',
      usedBytes: 108922,
      totalBytes: 141703
   },
   {
      url: 'https://www.google-analytics.com/analytics.js',
      type: 'js',
      usedBytes: 19665,
      totalBytes: 44287
   },
   {
      url: 'https://pptr.dev/style.css',
      type: 'css',
      usedBytes: 5135,
      totalBytes: 14326
   }
]
As expected, the output contains usedBytes and totalBytes for each file.
Measuring Performance
One objective of measuring performance in terms of websites is to analyze how a page performs, during load and runtime – intending to make it faster.
Let’s see how we use Puppeteer to measure our page performance:
1️⃣ – Analyzing load time through metrics
Navigation Timing is a Web API that provides information and metrics relating to page navigation and load events, and accessible by window.performance.
In order to benefit from it, we should evaluate this API within the page context:
const puppeteer = require('puppeteer');

(async () => {
  const browser = await puppeteer.launch();
  const page = await browser.newPage();

  await page.goto('https://pptr.dev');
  await page.waitForSelector('title');

  // Executes Navigation API within the page context
  const metrics = await page.evaluate(() => JSON.stringify(window.performance));

  // Parses the result to JSON
  console.info(JSON.parse(metrics));

  await browser.close();
})();
Notice that if evaluate receives a function which returns a non-serializable value – then evaluate returns eventually undefined.
That’s exactly why we stringify window.performance when evaluating within the page context.
The result is transformed into a comfy object, which looks like the following:
{
   timeOrigin: 1562785571340.2559,
   timing: {
      navigationStart: 1562785571340,
      unloadEventStart: 0,
      unloadEventEnd: 0,
      redirectStart: 0,
      redirectEnd: 0,
      fetchStart: 1562785571340,
      domainLookupStart: 1562785571347,
      domainLookupEnd: 1562785571348,
      connectStart: 1562785571348,
      connectEnd: 1562785571528,
      secureConnectionStart: 1562785571425,
      requestStart: 1562785571529,
      responseStart: 1562785571607,
      responseEnd: 1562785571608,
      domLoading: 1562785571615,
      domInteractive: 1562785571621,
      domContentLoadedEventStart: 1562785571918,
      domContentLoadedEventEnd: 1562785571926,
      domComplete: 1562785572538,
      loadEventStart: 1562785572538,
      loadEventEnd: 1562785572538
   },
   navigation: {
      type: 0,
      redirectCount: 0
   }
}
Now we can simply combine these metrics and calculate different load times over the loading timeline.
For instance, loadEventEnd - navigationStart represents the time since the navigation started until the page is loaded.
Note: All explanations about the different timings above are available in this specification.
2️⃣ – Analyzing runtime through metrics
As far as the runtime metrics, unlike load time, Puppeteer provides a neat API:
const puppeteer = require('puppeteer');

(async () => {
  const browser = await puppeteer.launch();
  const page = await browser.newPage();

  await page.goto('https://pptr.dev');
  await page.waitForSelector('title');

  // Returns runtime metrics of the page
  const metrics = await page.metrics();
  console.info(metrics);

  await browser.close();
})();
We invoke the metrics method and get the following result:
{
   Timestamp: 6400.768827, // When the metrics were taken
   Documents: 13, // Number of documents
   Frames: 7, // Number of frames
   JSEventListeners: 33, // Number of events
   Nodes: 51926, // Number of DOM elements
   LayoutCount: 6, // Number of page layouts
   RecalcStyleCount: 13, // Number of page style recalculations
   LayoutDuration: 0.545877, // Total duration of all page layouts
   RecalcStyleDuration: 0.011856, // Total duration of all page style recalculations
   ScriptDuration: 0.064591, // Total duration of JavaScript executions
   TaskDuration: 1.244381, // Total duration of all performed tasks by the browser
   JSHeapUsedSize: 17158776, // Actual memory usage by JavaScript
   JSHeapTotalSize: 33492992 // Total memory usage, including free allocated space, by JavaScript
}
The interesting metric above is apparently JSHeapUsedSize which represents, in other words, the actual memory usage of the page.
Notice that the result is actually the output of Performance.getMetrics, which is part of Chrome DevTools Protocol.
3️⃣ – Analyzing browser activities through tracing
Chromium Tracing is a profiling tool that allows recording what the browser is really doing under the hood – with an emphasis on every thread, tab, and process.
And yet, it’s reflected in Chrome DevTools as part of the Timeline panel.
Furthermore, this tracing ability is possible with Puppeteer either – which, as we might guess, practically uses the Chrome DevTools Protocol.
For example, let’s record the browser activities during navigation:
const puppeteer = require('puppeteer');

(async () => {
  const browser = await puppeteer.launch();
  const page = await browser.newPage();

  // Starts to record a trace of the operations
  await page.tracing.start({ path: 'trace.json' });

  await page.goto('https://pptr.dev');
  await page.waitForSelector('title');

  // Stops the recording
  await page.tracing.stop();

  await browser.close();
})();
When the recording is stopped, a file called trace.json is created and contains the output that looks like:
{
   "traceEvents":[
      {
         "pid": 21975,
         "tid": 38147,
         "ts": 17376402124,
         "ph": "X",
         "cat": "toplevel",
         "name": "MessageLoop::RunTask",
         "args": {
            "src_file": "../../mojo/public/cpp/system/simple_watcher.cc",
            "src_func": "Notify"
         },
         "dur": 68,
         "tdur": 56,
         "tts": 26330
      },
      // More trace events
   ]
}
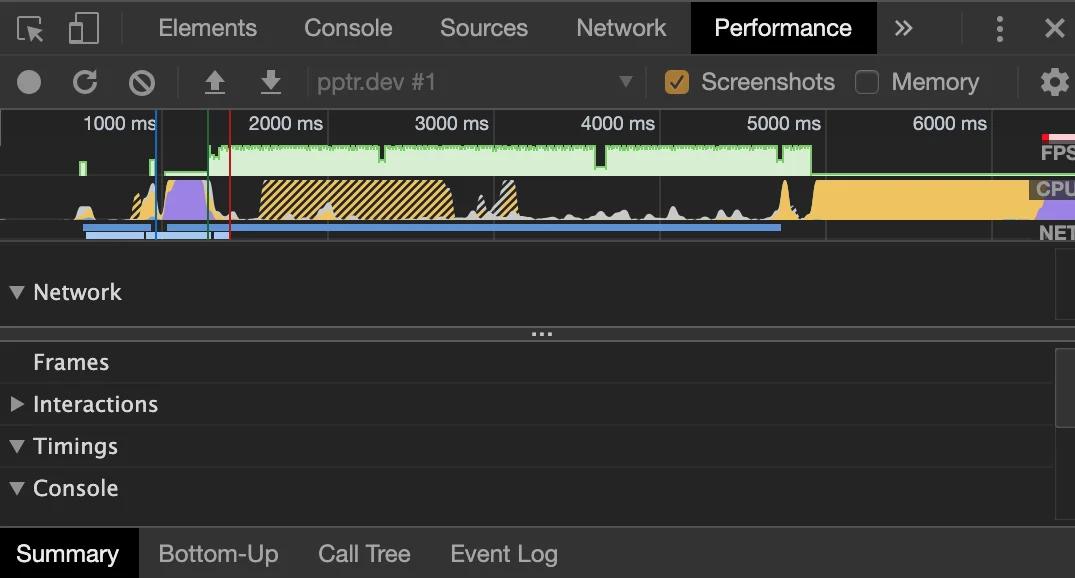
Now that we’ve the trace file, we can open it using Chrome DevTools, chrome://tracing or Timeline Viewer.
Here’s the Performance panel after importing the trace file into the DevTools:
Summary
We introduced today the Puppeteer’s API through concrete examples.
Let’s recap the main points:
- Puppeteer is a Node.js library for automating, testing and scraping web pages on top of the Chrome DevTools Protocol.
- Puppeteer’s ecosystem provides a lightweight package,
puppeteer-core, which is a library for browser automation – that interacts with any browser, which is based on DevTools protocol, without installing Chromium. - Puppeteer’s ecosystem provides a package, which is actually the full product, that installs Chromium in addition to the browser automation library.
- Puppeteer provides the ability to launch a Chromium browser instance or just connect an existing instance.
- Puppeteer’s ecosystem provides an experimental package,
puppeteer-firefox, that interacts with Firefox. - The browser context allows separating different sessions for a single browser instance.
- Puppeteer launches the browser in a headless mode by default, which merely uses the command line. Also – a headful mode, for opening the browser with a GUI, is supported either.
- Puppeteer provides several ways to debug our application in the browser, whereas, debugging the process that executes Puppeteer is obviously the same as debugging a regular Node.js process.
- Puppeteer allows navigating to a page by a URL and operating the page through the mouse and keyboard.
- Puppeteer allows examining a page’s visibility, behavior and responsiveness on various devices.
- Puppeteer allows taking screenshots of the page and generating PDFs from the content, easily.
- Puppeteer allows analyzing and testing the accessibility support in the page.
- Puppeteer allows speeding up the page performance by providing information about the dead code, handy metrics and manually tracing ability.
And finally, Puppeteer is a powerful browser automation tool with a pretty simple API.
A decent number of capabilities are supported, including such we haven’t covered at all – and that’s why your next step could definitely be [the official documentation][docs]. 😉
Here’s attached the final project:
VS Code Snippets
Well, if you wish to get some useful code snippets of Puppeteer API for Visual Studio Code – then the following extension might interest you:

You’re welcome to take a look at the extension page.