The Tip
Let’s enforce that every developer in our project will use Node.js 8.9.4 (currently, it’s the LTS version).
All we need to do is to install Node.js as a dependency:
npm install node@8.9.4 --save-exact
That’s all! 💪
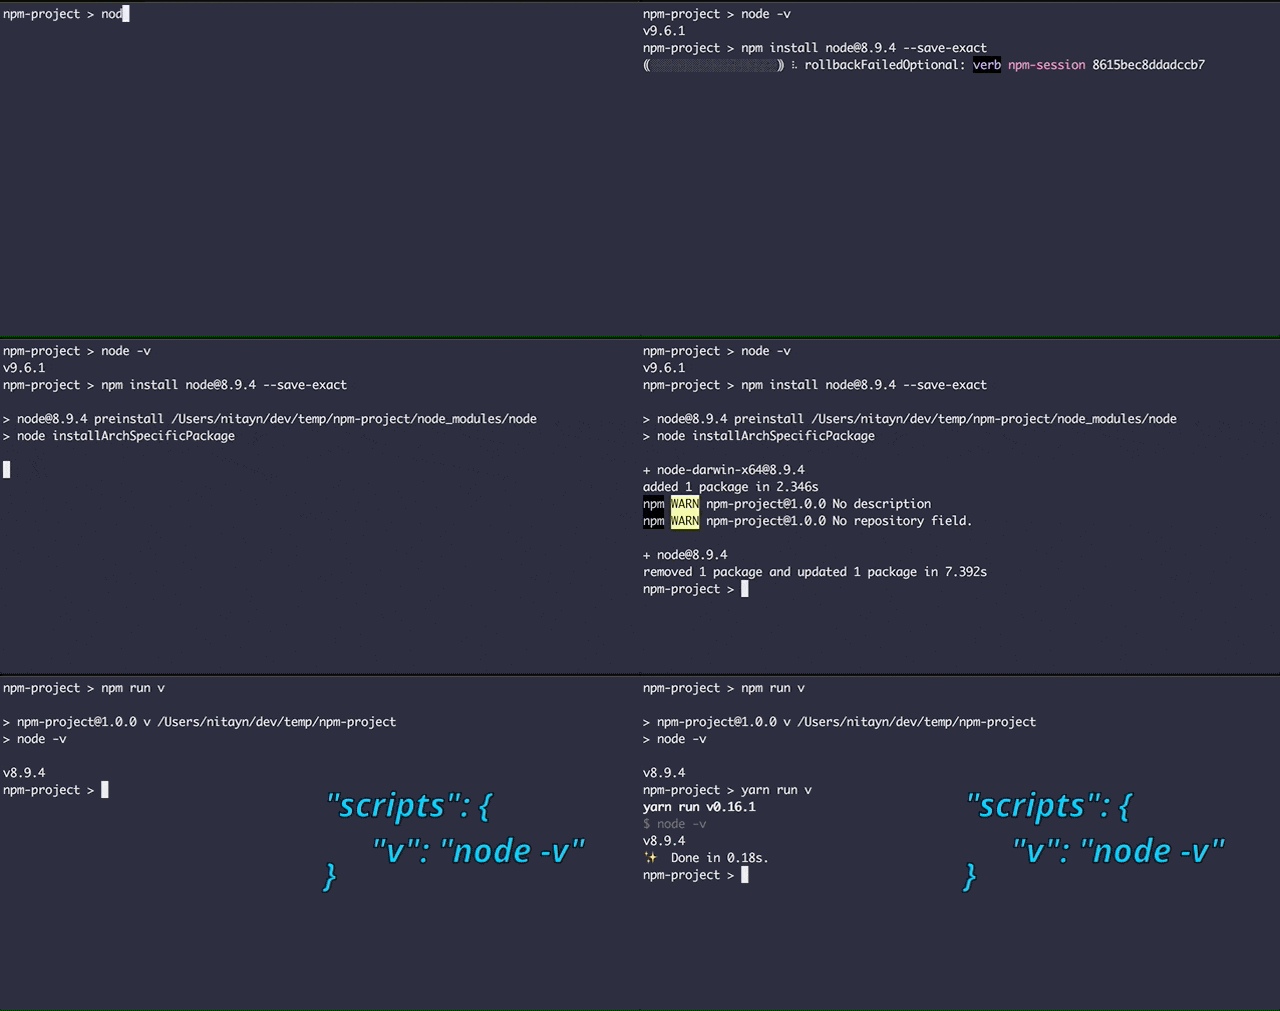
Let’s simulate the step:

Installing Node.js 8.9.4 locally for an npm project
At first, we check the global installed Node.js version using node -v and notice that’s the latest one (9.6.1). After running the installation command above, we insert an npm script for checking the local Node.js version:
Then, we execute that script using npm run v and receive the version we’ve just installed. As expected, the same output is received when executing the script using Yarn.
Note: Before npm 3.0.0, we could enforce a Node.js version using engineStrict flag and engines field. However, engineStrict was deprecated. Today, we specify a Node.js version in engines in order to warn about version conflicts.
How It Works
In principle, every executable file that arrives with an npm package - is linked to the local binaries directory within the project. It means that when we install such a package, we could find a link for its executable file inside ./node_modules/.bin (in case we haven’t changed the default path).
Let’s say we installed Webpack locally. In order to run the local executable file, we should execute ./node_modules/.bin/webpack.
It’s a bit tedious to insert the full path, so npm has its own trick:
Before running scripts, npm adds the local executables to the PATH environment variable.
Hence, in our case, a script like "webpack": "webpack" would invoke the local Webpack.
All right, let’s focus on Node.js. The npm registery includes a package which’s called “node”. Actually, it’s just a regular npm package which contains the Node.js binary, nothing more.
When we installed that package - the executable file was linked to the local binaries directory. So, the v script we’ve created invokes this link, which means, the local Node.js version. On top of that, any command within the project which involves node using the PATH environment variable - will be linked to the local Node.js binary.
Install As devDependency
As we know, npm doesn’t install packages that listed in devDependencies with the --only=production flag or when the NODE_ENV environment variable is set to production. In practice, it will prevent from Node.js executable file to be installed in production mode.
At first sight, it’s the well-known issue - should a package be installed as a dependency or devDependency?
The answer depends on what your team is trying to achieve. In case your team develops an internal application that doesn’t rely on Node.js in production (a web application for instance), you should install Node.js as a devDependency. Otherwise - you should install it as a regular dependency.
Using nvm
This tip is pretty cool, but it’s not the ideal solution for all cases. If you develop a public package, such a library, which relies on Node.js in production - you’d probably prefer not to use this tip at all, so that executable file won’t arrive with your public package.
In a case such as this, nvm and .nvmrc are possible solutions to standardize the Node.js version for your project. In addition, you can benefit from an automatic switching of Node.js versions when you cd into a directory which contains a .nvmrc file - by adding the following script to your ~/.bash_profile file:
Recap
Today we learned how to enforce a Node.js version simply in an npm package.
Key points to remember:
- An internal/public package that doesn’t rely on Node.js in production - install Node.js as a devDependency.
- An internal package that relies on Node.js in production - install Node.js as a regular dependency.
- A public package that relies on Node.js in production - consider using other tools to standardize the version, such as nvm.
Thanks to Kat Marchán & Cory House about this superb tip and Justin Noel for the nvm automatic switching script.
