"Angular CLI is the best thing which happened to Angular" – that’s how I was thinking for a long time. Simply, it lets you do a lot of stuff with no effort.
But then, Angular announced a new idea, called Angular Labs, which has a purpose of initiating new explorations. Basically, that’s the place that Angular Elements and Schematics came from. In this way, the Angular team made my heart skip a beat once again. 😍
So, how about integrating these awesome things and taking it for a test drive?
The Goal
What we are going to do is create an Angular workspace that contains a library – which will register an Angular Element as a custom element.
But that’s not all, our library will install the necessary dependencies, including polyfills, and will inject the exported module into the root module of a host application. In other words, we’re going to implement a basic example for ng add schematic.
In the end, we’ll get an Angular Package which consists of the library and that schematic we just mentioned.
Along with that – this article assumes you’re familiar with Angular Workspace and Angular Elements. Moreover, we’re not going to explain how to serve an Angular Element for non-Angular application. In case you’re curious and want to see a workaround which demonstrates this process, check out a previous article I’ve written.
Initializing a Workspace
Let’s not waste any time and take the Angular Element example from an article I referred above – with some little modifications, obviously.
This is the project in question:
It’s easy to perceive that:
- There is a single component (
MadeWithLoveComponent) which receives couple of inputs. - The component is declared in
AppModuleand registered as entry component. - A custom element is created from the component by
AppModuleand then registers insideCustomElementRegistry. - We don’t have a bootstrap component, therefore, we trigger the bootstrapping process manually.
Let’s start with the fun!
At first, we create a new workspace:
ng new made-with-love-workspace --style=scssNotice that we choose to define SCSS as our CSS preprocessor – for the sake of comfort only.
This workspace will include the library which we’re going to implement in the next step, beside the main application which will import the module that’s exported by the library and use the custom element we saw above.
Internal Library
Creating the Library
With Angular CLI v6, it’s so easy to create a library that transpiles to the Angular Package Format. 😉
We just have to run the following schematic:
ng generate library made-with-loveThen will be added a new internal project under projects:
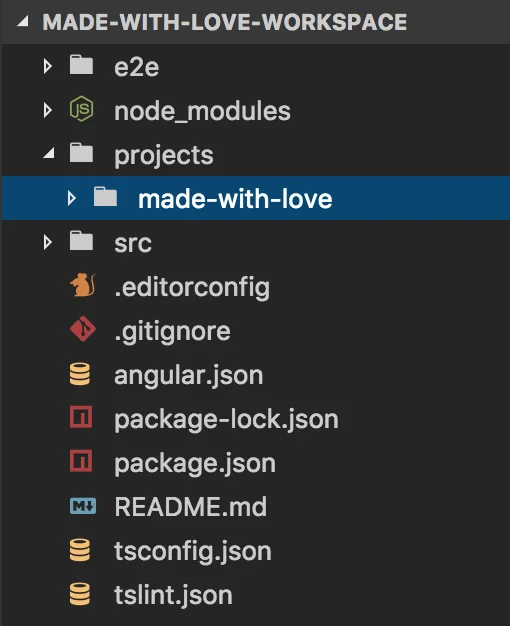
Well, we get a new directory made-with-love that contains src. A little deeper, there is lib, which is the place we’re going to shed our code.
Let’s create the made-with-love.component.ts file:
import { Component, OnInit, Input, ViewEncapsulation } from '@angular/core';

@Component({
  selector: 'made-with-love',
  template: `
    <ng-template #noUrl>
      {{ name }}
    </ng-template>
    <span [style.font-size.em]="size">
      Made with <span [style.color]="color">♥</span> by
      <ng-container *ngIf="url && url.length > 0; else noUrl">
        <a [attr.href]="url" target="_blank">{{ name }}</a>
      </ng-container>
    </span>
  `,
  styles: [`
    :host {
      display: inline-block;
    }

    span, a {
      font-family: Lato, sans-serif;
    }
    a {
      font-weight: bold;
      color: #000;
    }
  `],
  encapsulation: ViewEncapsulation.ShadowDom
})
export class MadeWithLoveComponent implements OnInit {
  @Input() public name: string;
  @Input() public url: string;
  @Input() public color = 'red';
  @Input() public size = 1;

  ngOnInit() {
    if (!this.name || this.name.length === 0) {
      console.error(`Name attribute must be provided!`);
    }
  }
}
To simplify, we use an inline template and styles. Beyond that, Angular v6.1.0 arrives with a new view encapsulation for ShadowDOM v1, instead of the deprecated ViewEncapsulation.Native – so let’s take advantage of it. 😎
Next step is to create a feature module file, which called made-with-love.module.ts:
import { NgModule, Injector } from '@angular/core';
import { CommonModule } from '@angular/common';
import { createCustomElement } from '@angular/elements';

import { MadeWithLoveComponent } from './made-with-love.component';

@NgModule({
  imports: [CommonModule],
  declarations: [MadeWithLoveComponent],
  entryComponents: [MadeWithLoveComponent]
})
export class MadeWithLoveModule {
  constructor(private injector: Injector) {
    const madeWithLoveElement = createCustomElement(MadeWithLoveComponent, { injector });
    customElements.define('made-with-love', madeWithLoveElement);
  }
}
Notice we don’t export the component – which defeats the purpose. Hence, we’ll have to apply CUSTOM_ELEMENTS_SCHEMA on our host module. It makes Angular accept non-Angular elements.
It’s clear that we want to export our module inside public_api.ts (the public barrel file) so it will be accessible externally using ES6 modules:
export * from './lib/made-with-love.module';Indeed, we’re making progress! 💪
Using the Library
So far we created an Angular workspace with an internal library.
Intuitively, we’d like to load our library’s module inside app.module.ts:
import { BrowserModule } from '@angular/platform-browser';
import { CUSTOM_ELEMENTS_SCHEMA, NgModule } from '@angular/core';
import { MadeWithLoveModule } from 'made-with-love';

import { AppComponent } from './app.component';

@NgModule({
  imports: [BrowserModule, MadeWithLoveModule],
  declarations: [AppComponent],
  schemas: [CUSTOM_ELEMENTS_SCHEMA],
  bootstrap: [AppComponent]
})
export class AppModule {}
Note: Definitely, we apply the schema for custom elements.
But, once we use ng start for running our host application – we’re supposed to get a transpilation error:
ERROR in src/app/app.module.ts(3,36): error TS2307: Cannot find module 'made-with-love'.It’s absolutely justified. We haven’t installed our module before (or any package which depends on it) – what means there is no package under node_modules that’s called made-with-love.
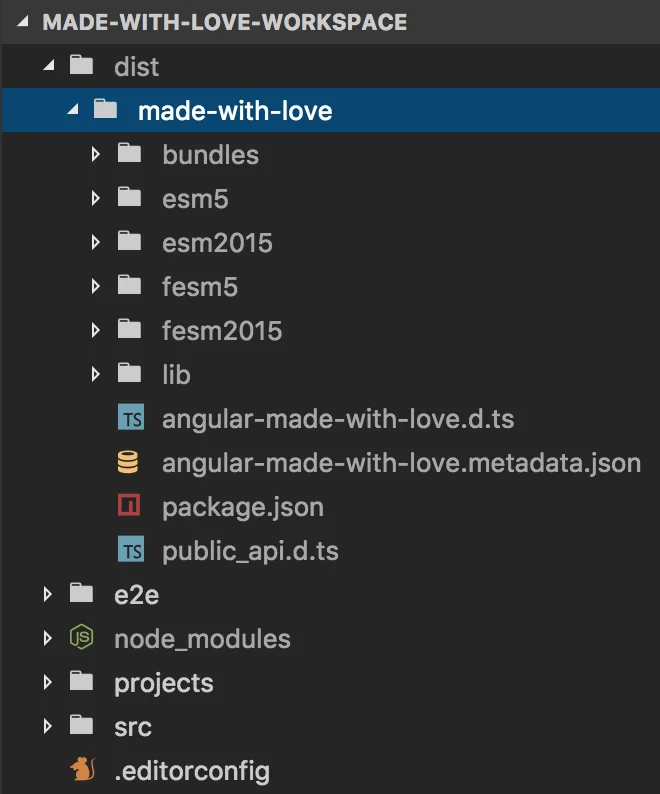
To solve it, the library should be built. Therefore, we should run ng run made-with-love:build. This will bundle our library in Angular Package Format and place it within dist directory:
Now, we can use the component we made inside app.component.ts:
<made-with-love name="Nitay Neeman" url="https://nitayneeman.com" size="2">
</made-with-love>
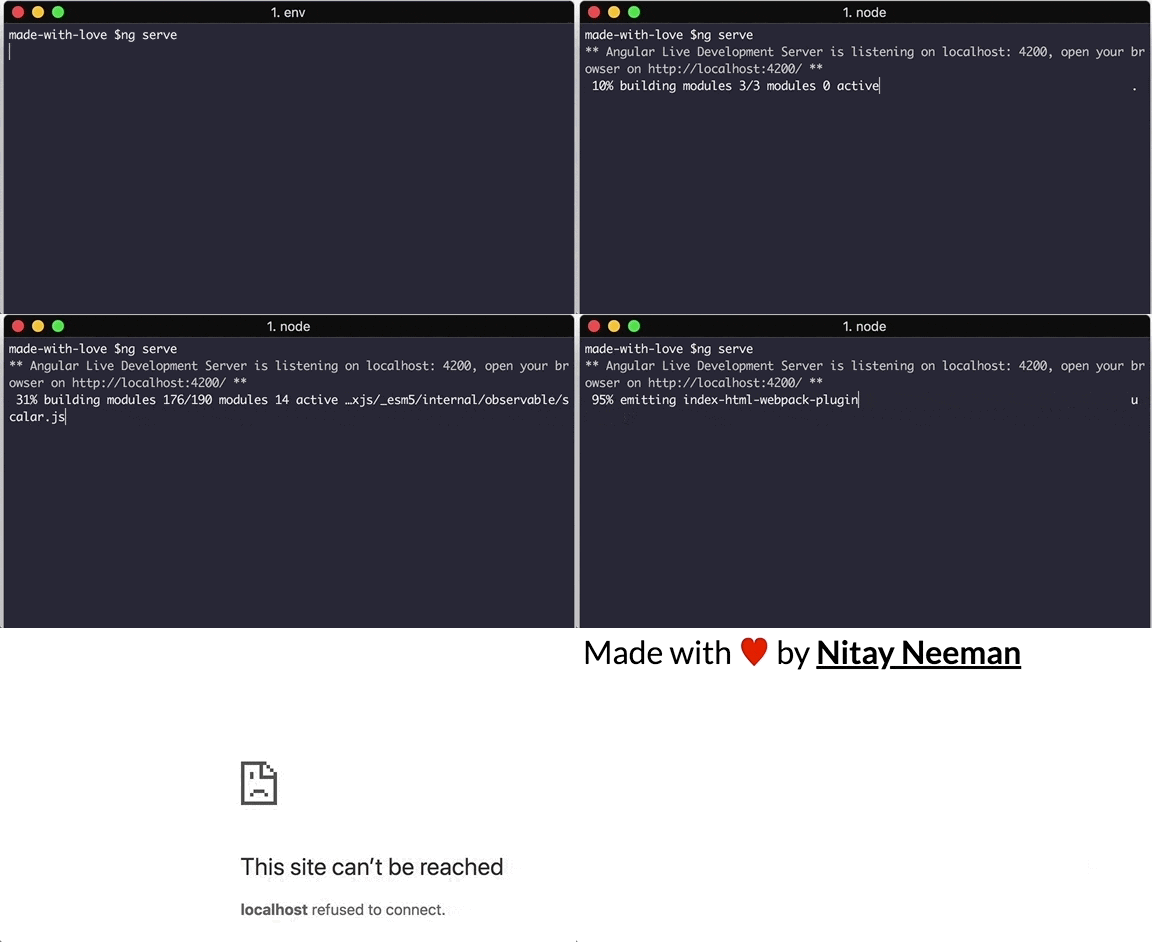
Here’s the result:
Wait, we shed the library’s output into dist instead of node_modules – so how is the ES6 import resolved? 🤔
The trick here is related to the compiler’s module resolution. We used a schematic for generating the library, which also appended a path mapping configuration to the main tsconfig.json file:
"paths": {
  "made-with-love": ["dist/made-with-love"],
  "made-with-love/*": ["dist/made-with-love/*"]
}
The paths above make the compiler to resolve the module out of dist directory. Notice that the mapping is relative to baseUrl – so it must be specified.
Schematics Project
We’ve just reached the interesting part. We’re going to create a schematics project with a simple collection and implement the ng add schematic.
If you’re not familiar with Schematics in general, read this guide. You can watch the following lecture also:
Let’s get to work! 👷
Creating the Project
Of course, there’s an automatic way to generate a schematics project:
schematics blank --name=schematicsNote: Assuming @angular-devkit/schematics-cli is installed globally.
However, we want to learn something today so let’s do it from scratch.
At first, we create a new directory called schematics inside projects. It’s possible to generate it on the root level, but in this article we’re going to consider it as an internal project.
Then, we install the necessary devDependencies:
npm install @angular-devkit/core @angular-devkit/schematics --save-devLet’s explain:
@angular-devkit/core– is a package with shared utilities for Angular DevKit. In practice it enables us to run schematics from CLI.@angular-devkit/schematics– is a package with the core of Schematics.
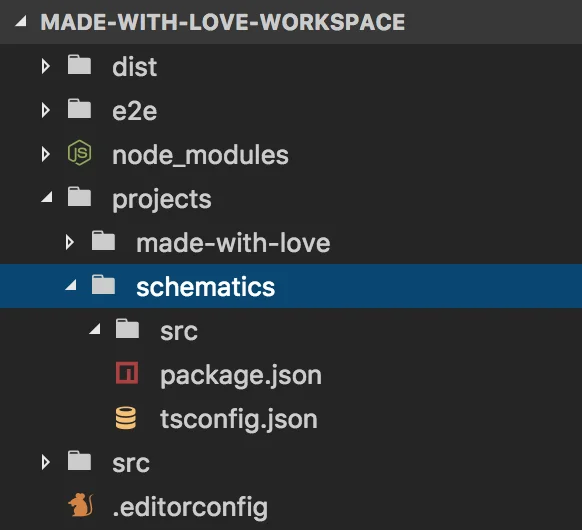
Well, we’re talking about an internal project. So in order to make it consistent with other internal projects, we’ll create the src directory, package.json, and tsconfig.json.
Let’s start with the package.json:
{
  "name": "schematics",
  "version": "0.0.0",
  "schematics": "./src/collection.json",
  "peerDependencies": {
    "@angular-devkit/core": "^0.6.8",
    "@angular-devkit/schematics": "^0.6.8",
    "typescript": "^2.5.2"
  }
}
The schematics property is what indicates our collection file – which describes a list of the implemented schematics in our project. Don’t worry, we’ll create a file like that later.
Next file is tsconfig.json:
{
  "compilerOptions": {
    "baseUrl": "tsconfig",
    "lib": ["es2017", "dom"],
    "module": "commonjs",
    "moduleResolution": "node",
    "noEmitOnError": true,
    "noFallthroughCasesInSwitch": true,
    "noImplicitAny": true,
    "noImplicitThis": true,
    "noUnusedParameters": true,
    "noUnusedLocals": true,
    "rootDir": "src/",
    "skipDefaultLibCheck": true,
    "skipLibCheck": true,
    "sourceMap": true,
    "strictNullChecks": true,
    "target": "es6",
    "types": ["jasmine", "node"]
  },
  "include": ["src/**/*"],
  "exclude": ["src/*/files/**/*"]
}
Notice we can extend the tsconfig.json from the root level, but let’s keep it simple. Along with that, the configuration above is directly taken from a project which was generated using schematics-cli.
Alright. This is how our workspace is supposed to seem right now:
Adding a Schematic
Well, we’ve an empty project for schematics and it’s about time to prepare our custom ng-add schematic.
This schematic will perform the following steps:
- It will add
@angular/elements,@webcomponents/custom-elementsandangular-made-with-loveintopackage.json. - It will run
npm install. - It will import
MadeWithLoveModuleinto the root module of the host application. - It will inject the polyfill’s script file into the
scriptsof the host application.
Note: We could use ng add @angular/elements, but here we want to learn how to implement it on our own.
First up, we have an unsolved debt to create a collection file. So, let’s create collection.json and place it within src:
{
  "$schema": "./node_modules/@angular-devkit/schematics/collection-schema.json",
  "schematics": {
    "ng-add": {
      "description": "Installs and injects the MadeWithLove library",
      "factory": "./ng-add/index"
    }
  }
}
As you can see, we describe only one schematic and that’s ng-add. The factory property represents a reference for a file which contains the schematic’s exported factory function. Next to collection file, we create the ng-add directory that contains an index.ts file.
Before we start to implement the steps we mentioned above – we’ll install a utility library for Schematics, which is called schematics-utilities.
To be honest with you, it’s a library I created a while ago. This library provides us several utilities that we’re going to take advantage of.
So let’s install it:
npm install schematics-utilities --save-devDisclaimer: Please take the following implementations with a grain of salt – these are just a couple of examples.
Spoiler: The final package will be published as angular-made-with-love so from now on we’ll adopt that package name.
Now, let’s navigate to ng-add/index.ts and start implementing the first step – so our schematic will be able to add to package.json the necessary packages.
We create a RuleFactory function which does that:
function addPackageJsonDependencies(): Rule {
  return (host: Tree, context: SchematicContext) => {
    const dependencies: NodeDependency[] = [
      { type: NodeDependencyType.Default, version: '~6.1.1', name: '@angular/elements' },
      { type: NodeDependencyType.Default, version: '~1.1.0', name: '@webcomponents/custom-elements' },
      { type: NodeDependencyType.Default, version: '~1.1.0', name: 'angular-made-with-love' }
    ];

    dependencies.forEach(dependency => {
      addPackageJsonDependency(host, dependency);
      context.logger.log('info', `✅️ Added "${dependency.name}" into ${dependency.type}`);
    });

    return host;
  };
}
All we do in the code above is to iterate a list of packages and invoke addPackageJsonDependency for each of them. The addPackageJsonDependency function is imported out of schematics-utilities (we’ll see the imports in the final result).
In case you get confused, Rule is essentially a function that returns a Tree:
export declare type Rule = (tree: Tree, context: SchematicContext) => Tree;Notice that Rule function could return Observable<Tree> or void type as well.
Next step is installing the packages. This following RuleFactory function performs it simply:
function installPackageJsonDependencies(): Rule {
  return (host: Tree, context: SchematicContext) => {
    context.addTask(new NodePackageInstallTask());
    context.logger.log('info', `🔍 Installing packages...`);

    return host;
  };
}
Basically, NodePackageInstallTask does all the job for us. It’s boilerplate code for a schematic task which is imported out of @angular-devkit and installs the packages using a package manager.
Next step is importing MadeWithLoveModule into the root module of the host application.
Here’s an appropriate RuleFactory function:
function addModuleToImports(options: any): Rule {
  return (host: Tree, context: SchematicContext) => {
    const workspace = getWorkspace(host);
    const project = getProjectFromWorkspace(
      workspace,
      // Takes the first project in case it's not provided by CLI
      options.project ? options.project : Object.keys(workspace['projects'])[0]
    );
    const moduleName = 'MadeWithLoveModule';

    addModuleImportToRootModule(host, moduleName, 'angular-made-with-love', project);
    context.logger.log('info', `✅️ "${moduleName}" is imported`);

    return host;
  };
}
What we can see above is – retrieving the workspace of the host application using getWorkspace. Likewise, we pass it through getProjectFromWorkspace along with a project name in order to retrieve the project’s configuration.
Then, we just invoke addModuleImportToRootModule and pass into that:
host– ATreerepresentation for host workspace.moduleName– A module to inject (MadeWithLoveModulein our case).angular-made-with-love– The package which the module is imported from.project– A project’s configuration which the module will be injected.
Great, we’re almost done!
The last step is, as we declared before, to inject the polyfill’s script file into the scripts array of the host application.
This RuleFactory function is a little complicated from the previous functions:
function addPolyfillToScripts(options: any) {
  return (host: Tree, context: SchematicContext) => {
    const polyfillName = 'custom-elements';
    const polyfillPath = 'node_modules/@webcomponents/custom-elements/src/native-shim.js';

    try {
      const angularJsonFile = host.read('angular.json');

      if (angularJsonFile) {
        const angularJsonFileObject = JSON.parse(angularJsonFile.toString('utf-8'));
        const project = options.project ? options.project : Object.keys(angularJsonFileObject['projects'])[0];
        const projectObject = angularJsonFileObject.projects[project];
        const scripts = projectObject.targets.build.options.scripts;

        scripts.push({
          input: polyfillPath
        });
        host.overwrite('angular.json', JSON.stringify(angularJsonFileObject, null, 2));
      }
    } catch (e) {
      context.logger.log('error', `🚫 Failed to add the polyfill "${polyfillName}" to scripts`);
    }

    context.logger.log('info', `✅️ Added "${polyfillName}" polyfill to scripts`);

    return host;
  };
}
Just for the record, the code above is inspired by ng-add schematic of @angular/elements check it out). Well, what happens there is that we read and parse the angular.json file and then retrieve the project’s configuration. Right after that, we push into the scripts array a new object with the polyfill’s path, and eventually we stringify and replace the file’s content with the new configuration.
All that’s left is to do is creating a default RuleFactory function which operates the functions we’ve just created.
Here we go:
export default function(options: any): Rule {
  return chain([
    options && options.skipPackageJson ? noop() : addPackageJsonDependencies(),
    options && options.skipPackageJson ? noop() : installPackageJsonDependencies(),
    options && options.skipModuleImport ? noop() : addModuleToImports(options),
    options && options.skipPolyfill ? noop() : addPolyfillToScripts(options)
  ]);
}
Obviously, the default exported RuleFactory function is supposed to return a Rule. In the last code snippet, we use chain exactly for that objective – returning a single combined Rule from multiple RuleFactory functions. From here, it’s pretty straightforward – we invoke these functions according to the steps we previously defined.
Note that we allow skipping the steps by providing respective CLI parameters: skipPackageJson, skipModuleImport and skipPolyfill.
Finally, here’s the final result:
import { chain, noop, Rule, SchematicContext, Tree } from '@angular-devkit/schematics';
import { NodePackageInstallTask } from '@angular-devkit/schematics/tasks';
import {
  addModuleImportToRootModule,
  addPackageJsonDependency,
  getProjectFromWorkspace,
  getWorkspace,
  NodeDependency,
  NodeDependencyType
} from 'schematics-utilities';

function addPackageJsonDependencies(): Rule {
  return (host: Tree, context: SchematicContext) => {
    const dependencies: NodeDependency[] = [
      { type: NodeDependencyType.Default, version: '~6.1.1', name: '@angular/elements' },
      { type: NodeDependencyType.Default, version: '~1.1.0', name: '@webcomponents/custom-elements' },
      { type: NodeDependencyType.Default, version: '~1.1.0', name: 'angular-made-with-love' }
    ];

    dependencies.forEach(dependency => {
      addPackageJsonDependency(host, dependency);
      context.logger.log('info', `✅️ Added "${dependency.name}" into ${dependency.type}`);
    });

    return host;
  };
}

function installPackageJsonDependencies(): Rule {
  return (host: Tree, context: SchematicContext) => {
    context.addTask(new NodePackageInstallTask());
    context.logger.log('info', `🔍 Installing packages...`);

    return host;
  };
}

function addModuleToImports(options: any): Rule {
  return (host: Tree, context: SchematicContext) => {
    const workspace = getWorkspace(host);
    const project = getProjectFromWorkspace(
      workspace,
      // Takes the first project in case it's not provided by CLI
      options.project ? options.project : Object.keys(workspace['projects'])[0]
    );
    const moduleName = 'MadeWithLoveModule';

    addModuleImportToRootModule(host, moduleName, 'angular-made-with-love', project);
    context.logger.log('info', `✅️ "${moduleName}" is imported`);

    return host;
  };
}

function addPolyfillToScripts(options: any) {
  return (host: Tree, context: SchematicContext) => {
    const polyfillName = 'custom-elements';
    const polyfillPath = 'node_modules/@webcomponents/custom-elements/src/native-shim.js';

    try {
      const angularJsonFile = host.read('angular.json');

      if (angularJsonFile) {
        const angularJsonFileObject = JSON.parse(angularJsonFile.toString('utf-8'));
        const project = options.project ? options.project : Object.keys(angularJsonFileObject['projects'])[0];
        const projectObject = angularJsonFileObject.projects[project];
        const scripts = projectObject.targets.build.options.scripts;

        scripts.push({
          input: polyfillPath
        });
        host.overwrite('angular.json', JSON.stringify(angularJsonFileObject, null, 2));
      }
    } catch (e) {
      context.logger.log('error', `🚫 Failed to add the polyfill "${polyfillName}" to scripts`);
    }

    context.logger.log('info', `✅️ Added "${polyfillName}" polyfill to scripts`);

    return host;
  };
}

export default function(options: any): Rule {
  return chain([
    options && options.skipPackageJson ? noop() : addPackageJsonDependencies(),
    options && options.skipPackageJson ? noop() : installPackageJsonDependencies(),
    options && options.skipModuleImport ? noop() : addModuleToImports(options),
    options && options.skipPolyfill ? noop() : addPolyfillToScripts(options)
  ]);
}
Running a Schematic
Our schematics project is written in TypeScript. This means, as you guess, that we need to transpile the source code to plain JavaScript somehow before running a specific schematic.
Let’s run the following line on the root level:
tsc -p projects/schematics/tsconfig.jsonAlright, new index.js and index.js.map files appear within ng-add – what clearly means that something indeed was built there. Using these files, we will run our ng-add schematic.
Note: Make sure your global installed TypeScript package is up-to-date.
Generally, in order to run any schematic – the following CLI convention should be adopted:
schematics project-name:schematic-name parametersSo, in our case, we could type (assuming that we’re navigated to projects/schematics):
schematics .:ng-add --skipModuleImport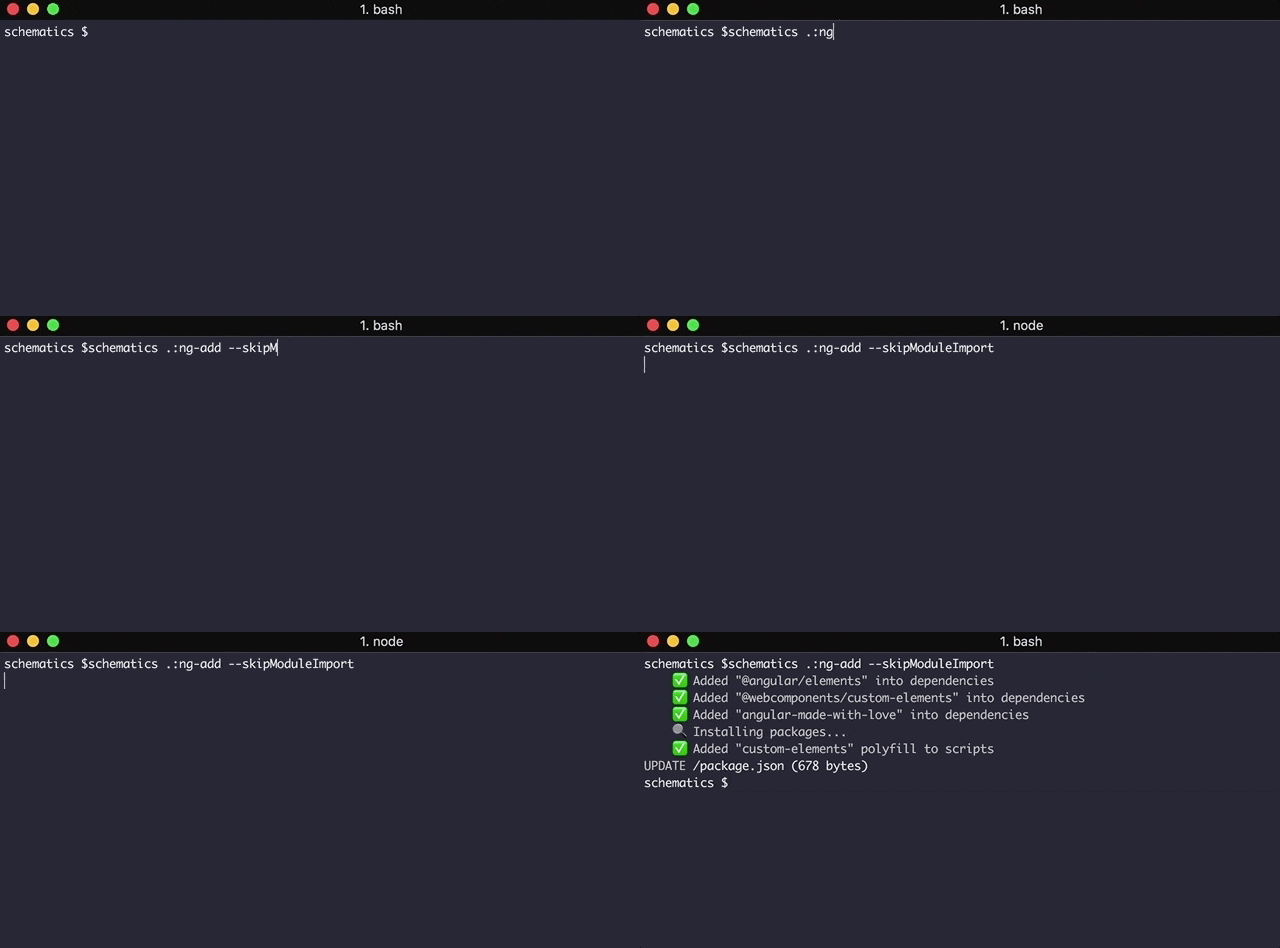
As we see, . represents the current directory (projects/schematics), ng-add is the schematic’s name and --skipModuleImport is just a supported parameter by the schematic.
Important to note that:
- In case we run the schematic without
--skipModuleImport, we’d get a transpilation error:Could not find (undefined)due to the fact that our schematic isn’t executed from the root of the workspace and therefore – it couldn’t locate it. Don’t worry, this problem will be solved soon when we actually use it from another project – so let’s ignore it right now (in order to avoid redundant complexity). - The default of running a schematic is
dry-runmode, which prevents from the schematics tool from actually creating and changing files.
Publishing Process
Let’s recap what we did so far:
- We initialized an Angular Workspace, which would contain internal projects.
- We created an Angular library that provides a simple Angular Element.
- We created a Schematics project that provides the
ng-addschematic.
But how do we integrate these and make from them a single Angular Package which is ready to be published? 🤔
Adding npm Scripts
Until now, we used manually commands to build both internal projects. This seems like an appropriate moment to add some handy npm scripts into the package.json.
Here’s the new scripts property:
"scripts": {
  "ng": "ng",
  "start": "ng serve",
  "build": "ng build",
  "test": "ng test",
  "lint": "ng lint",
  "lib:build": "ng run made-with-love:build",
  "lib:build:prod": "ng run made-with-love:build:production",
  "lib:test": "ng run made-with-love:test",
  "lib:lint": "ng run made-with-love:lint",
  "schematics:build": "tsc -p projects/schematics/tsconfig.json"
}
We’ve already seen the commands of lib:build and schematics:build, whereas the other commands are pretty understandable.
Great, now we can build both projects easily!
Copying Schematics to "dist"
Let’s assume we run lib:build:prod and the library is created within dist. As we remember, the package.json expects that the collection file will be placed next to it – inside a schematics directory.
However, that’s not the case here and that means we should copy the outputs of the schematics project in some way into dist/made-with-love/schematics.
There are a lot of ways to do that, though, we’re going to choose webpack for this mission.

Apparently, webpack is installed indirectly, but – let’s install these packages explicitly:
npm install webpack webpack-node-externals copy-webpack-plugin --save-devThen, we create the webpack.config.js file on the root level:
const path = require('path');
const nodeExternals = require('webpack-node-externals');
const CopyWebpackPlugin = require('copy-webpack-plugin');

module.exports = {
  entry: './projects/schematics/src/ng-add/index.js',
  output: {
    path: path.resolve(__dirname, 'dist/made-with-love/schematics/ng-add'),
    filename: 'index.js',
    libraryTarget: 'commonjs2'
  },
  mode: 'production',
  target: 'node',
  externals: [
    nodeExternals({
      whitelist: ['schematics-utilities', 'npm-registry-client']
    })
  ],
  plugins: [
    new CopyWebpackPlugin(
      [
        {
          from: 'projects/schematics/src/collection.json',
          to: '../collection.json',
          toType: 'file'
        }
      ],
      {}
    )
  ]
};
Assuming that schematics:build was executed, webpack will copy the output of ng-add/index.ts and the collection file into the destined directory. Also, it’ll bundle some needed utilities from schematics-utilities.
Note that it’s not a best practice to include third-party code with a published package – we definitely should avoid from that. However, in our case, we’d not like that a host application would have to install schematics-utilities before running ng-add – because it misses the whole point.
In order to bundle we just have to type webpack, although, wrapping it with an npm script which builds the project before – would be much preferable:
"schematics:copy": "npm run schematics:build && webpack"We’re almost at the end, I promise you. 😉
Publishing the Package
Before any publish, we must build our library and include inside it the outputs of the schematics project. Hence, we add an additional npm script:
"build-package": "npm run lib:build:prod && npm run schematics:copy"Let’s run npm run build-package and then navigate to dist/made-with-love.
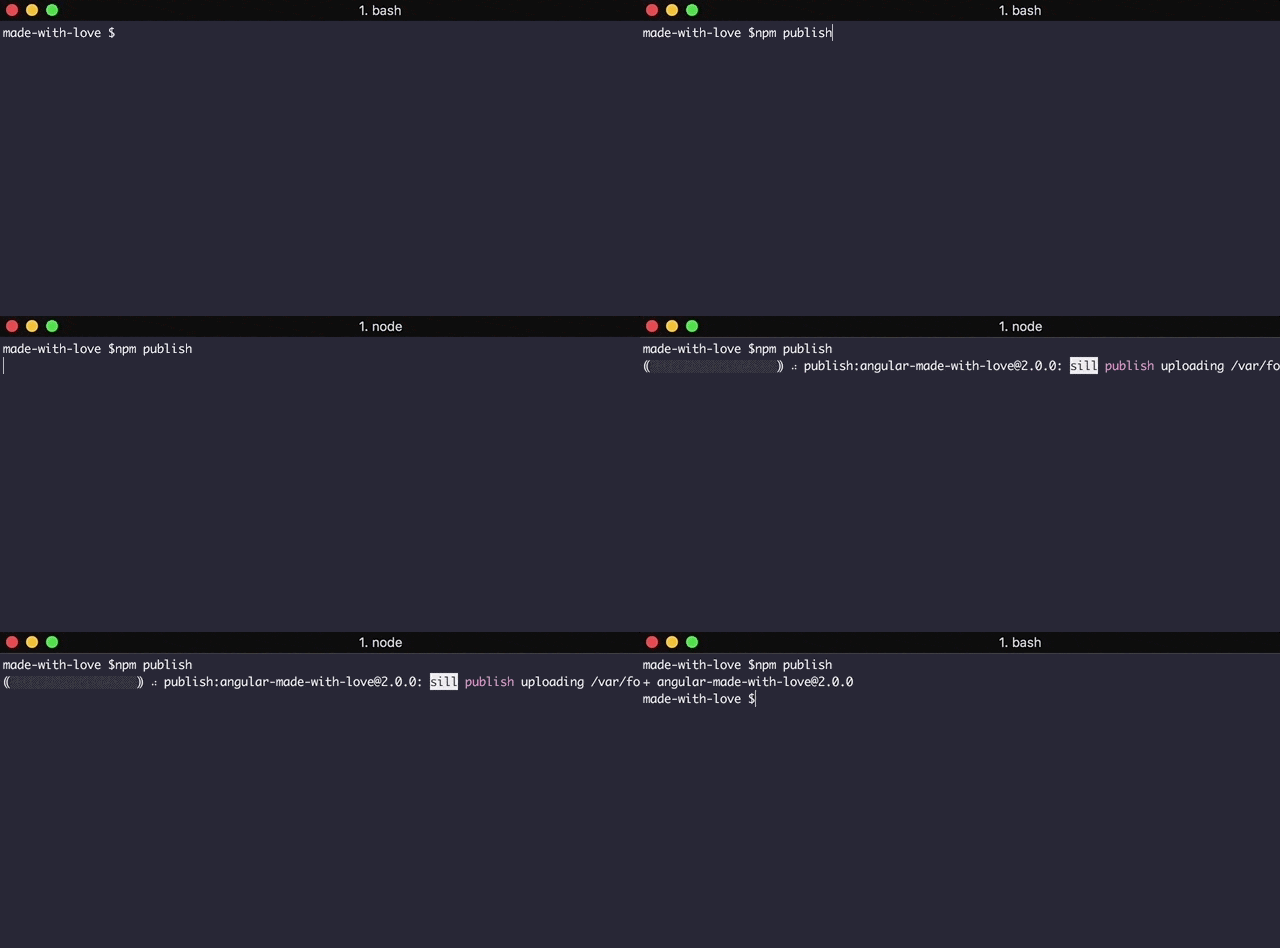
Now – it’s the moment to publish! 🚀
Running npm publish there will do the job:
Demo Application
Let’s initialize a new project to demonstrate what we did today:
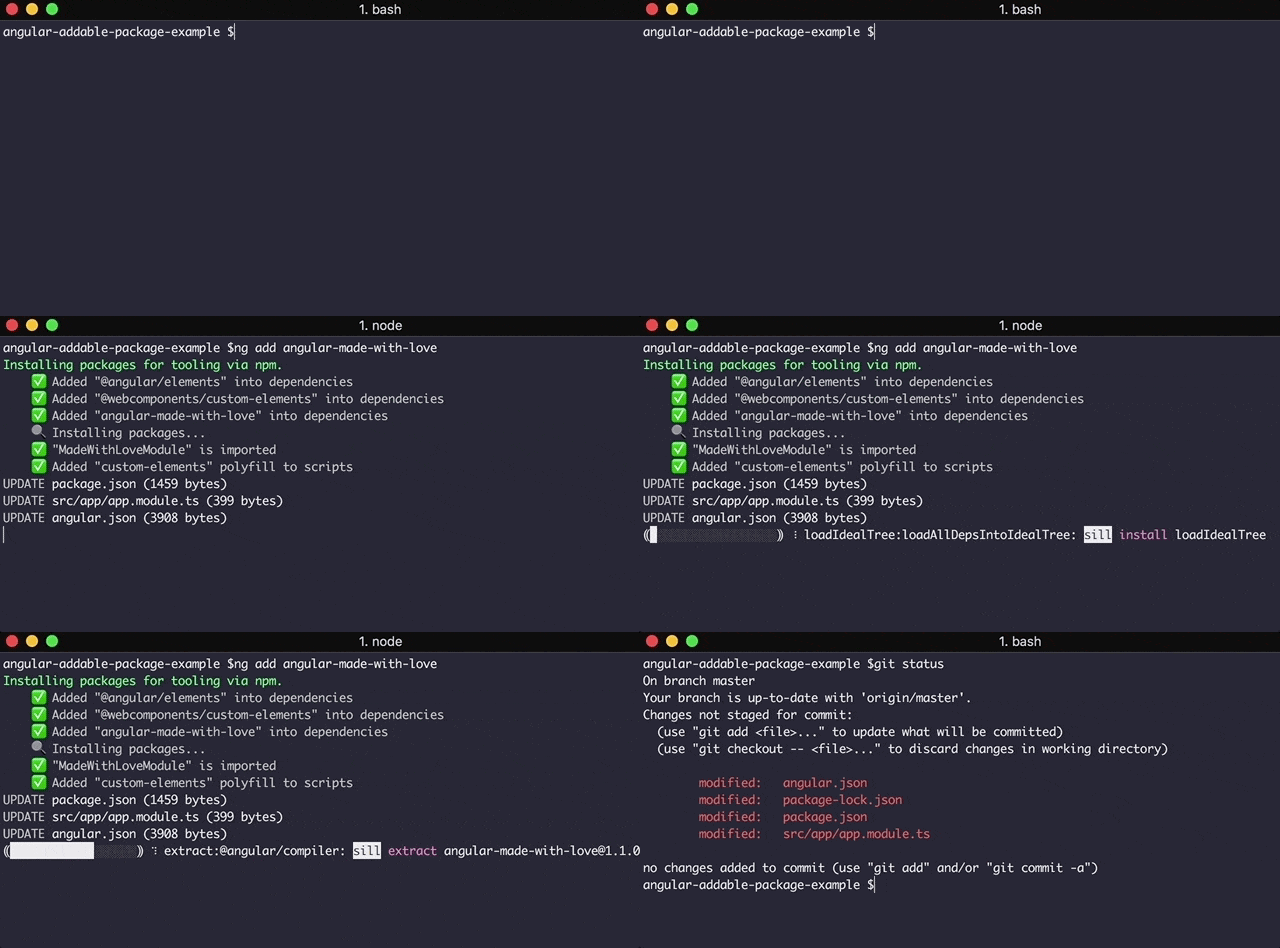
ng new angular-addable-package-exampleAll that we have left is to run ng add angular-made-with-love:
ng addSummary
Today we’d a long journey on purpose to build our addable Angular Package.
We started by initializing an Angular Workspace and an internal library. We continued with implementing a simple Angular Element as part of our library. Then, we created a Schematics project from scratch and implemented there an example of a schematic. Lastly, we built everything that’s related to the final output and published it.
Here is the source code of the projects we created:
A few key points to keep in mind:
- Creating a library that transpiles to the Angular Package Format using Angular CLI v6 is extremely easy.
- Angular v6.1.0 arrives with a new view encapsulation for ShadowDOM v1.
- There is no point in exporting an Angular Element’s component as part of the module.
- In case we’re using an Angular Element inside an Angular application – we should apply
CUSTOM_ELEMENTS_SCHEMAon the module which uses it. - Internal libraries are imported out of
distinstead ofnode_modulesby default, due to the path mapping configuration – which is added into thetsconfig.jsonwhile we generate the library using Angular CLI. - The
@angular-devkit/corepackage is what lets us to run schematics from the CLI. - We must append a
schematicsproperty which points to a collection file, for our schematics set, inside the publishedpackage.json. - The
schematics-utilitiespackage is what provides us a collection of shared utilities for working with Schematics. - A
RuleFactoryis a function which returns aRule. - A
Ruleis a function which returns a manipulatedTree. - A schematics project should be built before running it.
- The
dry-runmode for a schematics project prevents changes of our file system. - Adding
npmscripts is pretty useful when we want to manipulate the various internal projects on the workspace level.
I hope this article was informative and not exhausting for you – but you must know that was written with ❤️.